
How To Ice Tie Dye to Create a Mandala
One of the most visually impressive tie-dye patterns ever is the mandala fold, but clear instructions can be a little bit elusive. You can do this as a beginner. The steps are logical, they just take some practice.
Whether you dye your mandala with liquid dyes, create an ice dye mandala it with powdered dyes, or dip-dye it, the beautiful points and lines of a mandala fold are super visually impactful! Here at WAXON, we teach the mandala tie-dye as an “advanced” folding technique, but once you’ve got some practice, it’s really not that hard at all.
I have found that through teaching it, my brain has memorized the steps, and even the tying part goes more smoothly now than it did when I was first starting out. Once you’ve mastered the basic mandala, you can do a lot with it, and move on to more complicated versions, like the dream catcher fold.
This blog post is all about how to fold, how to tie, and how to dye a mandala for ice dyeing. Three different skills, sort of like a trilogy of mandala-making. I love ice dyeing them, but you can also use liquid dyes in a bottle, or a combo of both (as you’ll see below in my step-by-step pictures).
A big thanks goes out to the folks in the tie-dye Facebook groups for chiming in on what questions they’d like me to answer in this post. If you have additional questions, feel free to comment at the bottom! And a huge thank you to my friend and fellow dyer Melsy, who was the first person ever to show me how to tie a mandala back in 2017.
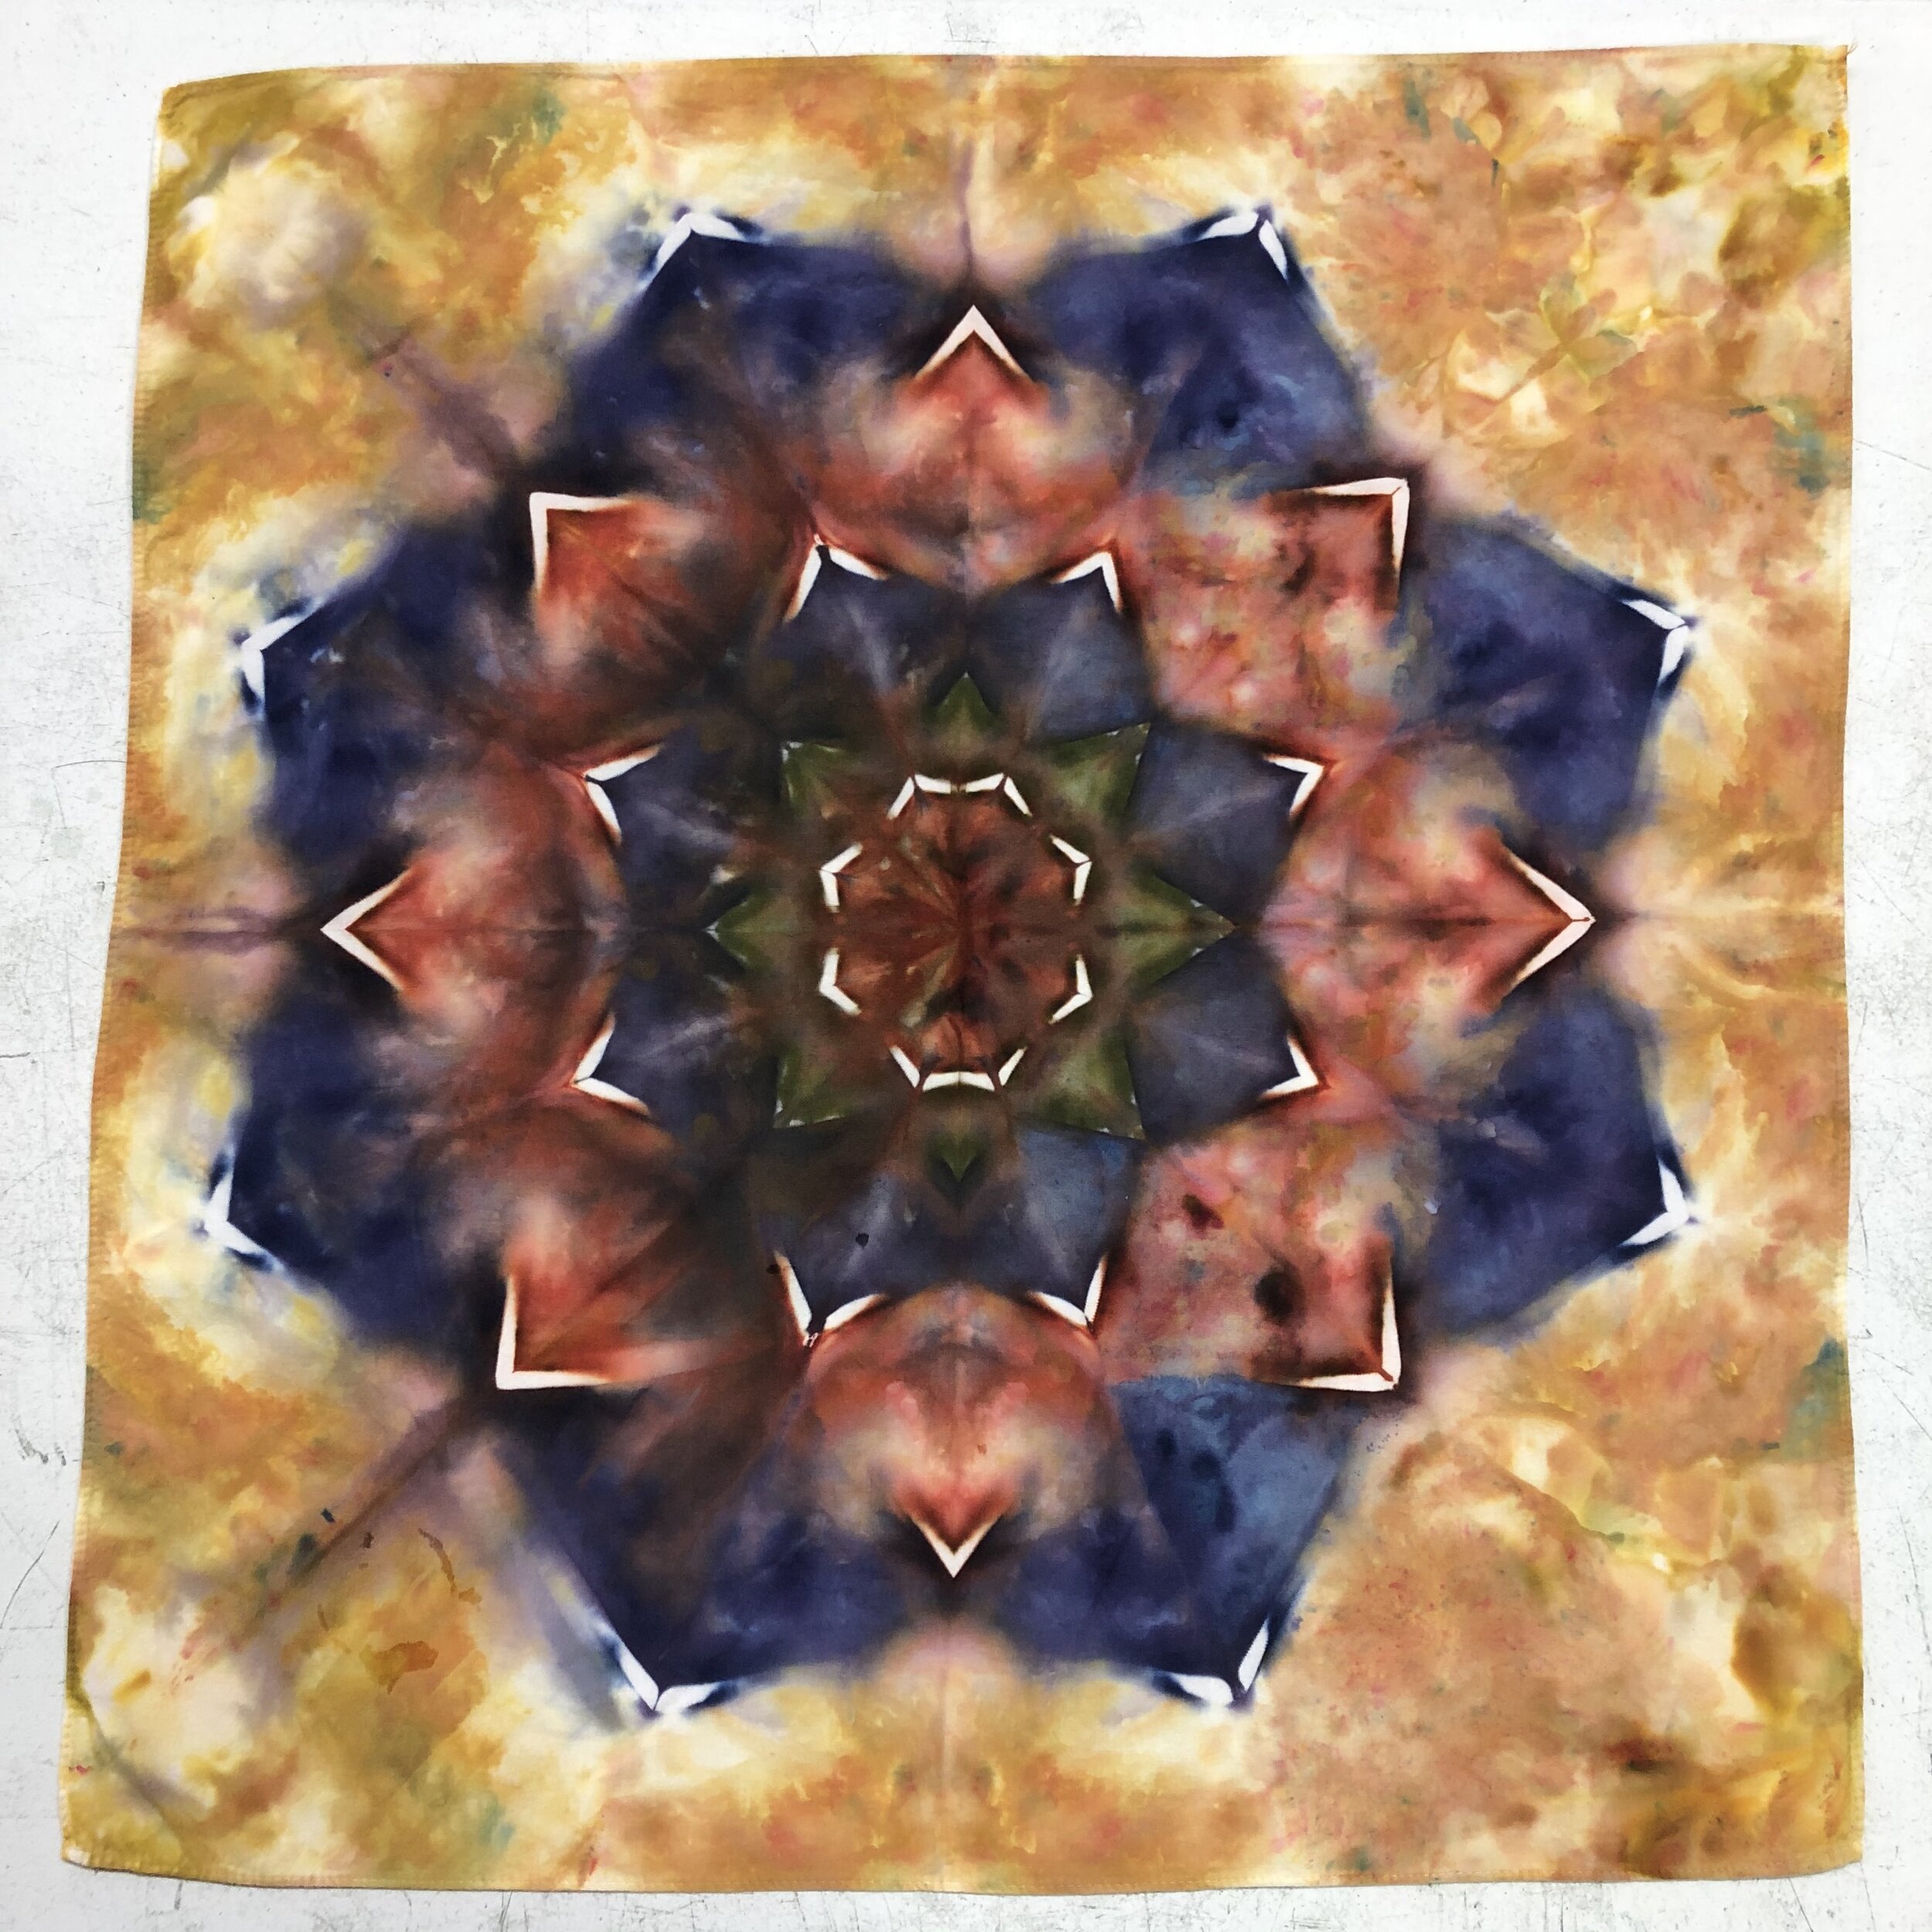
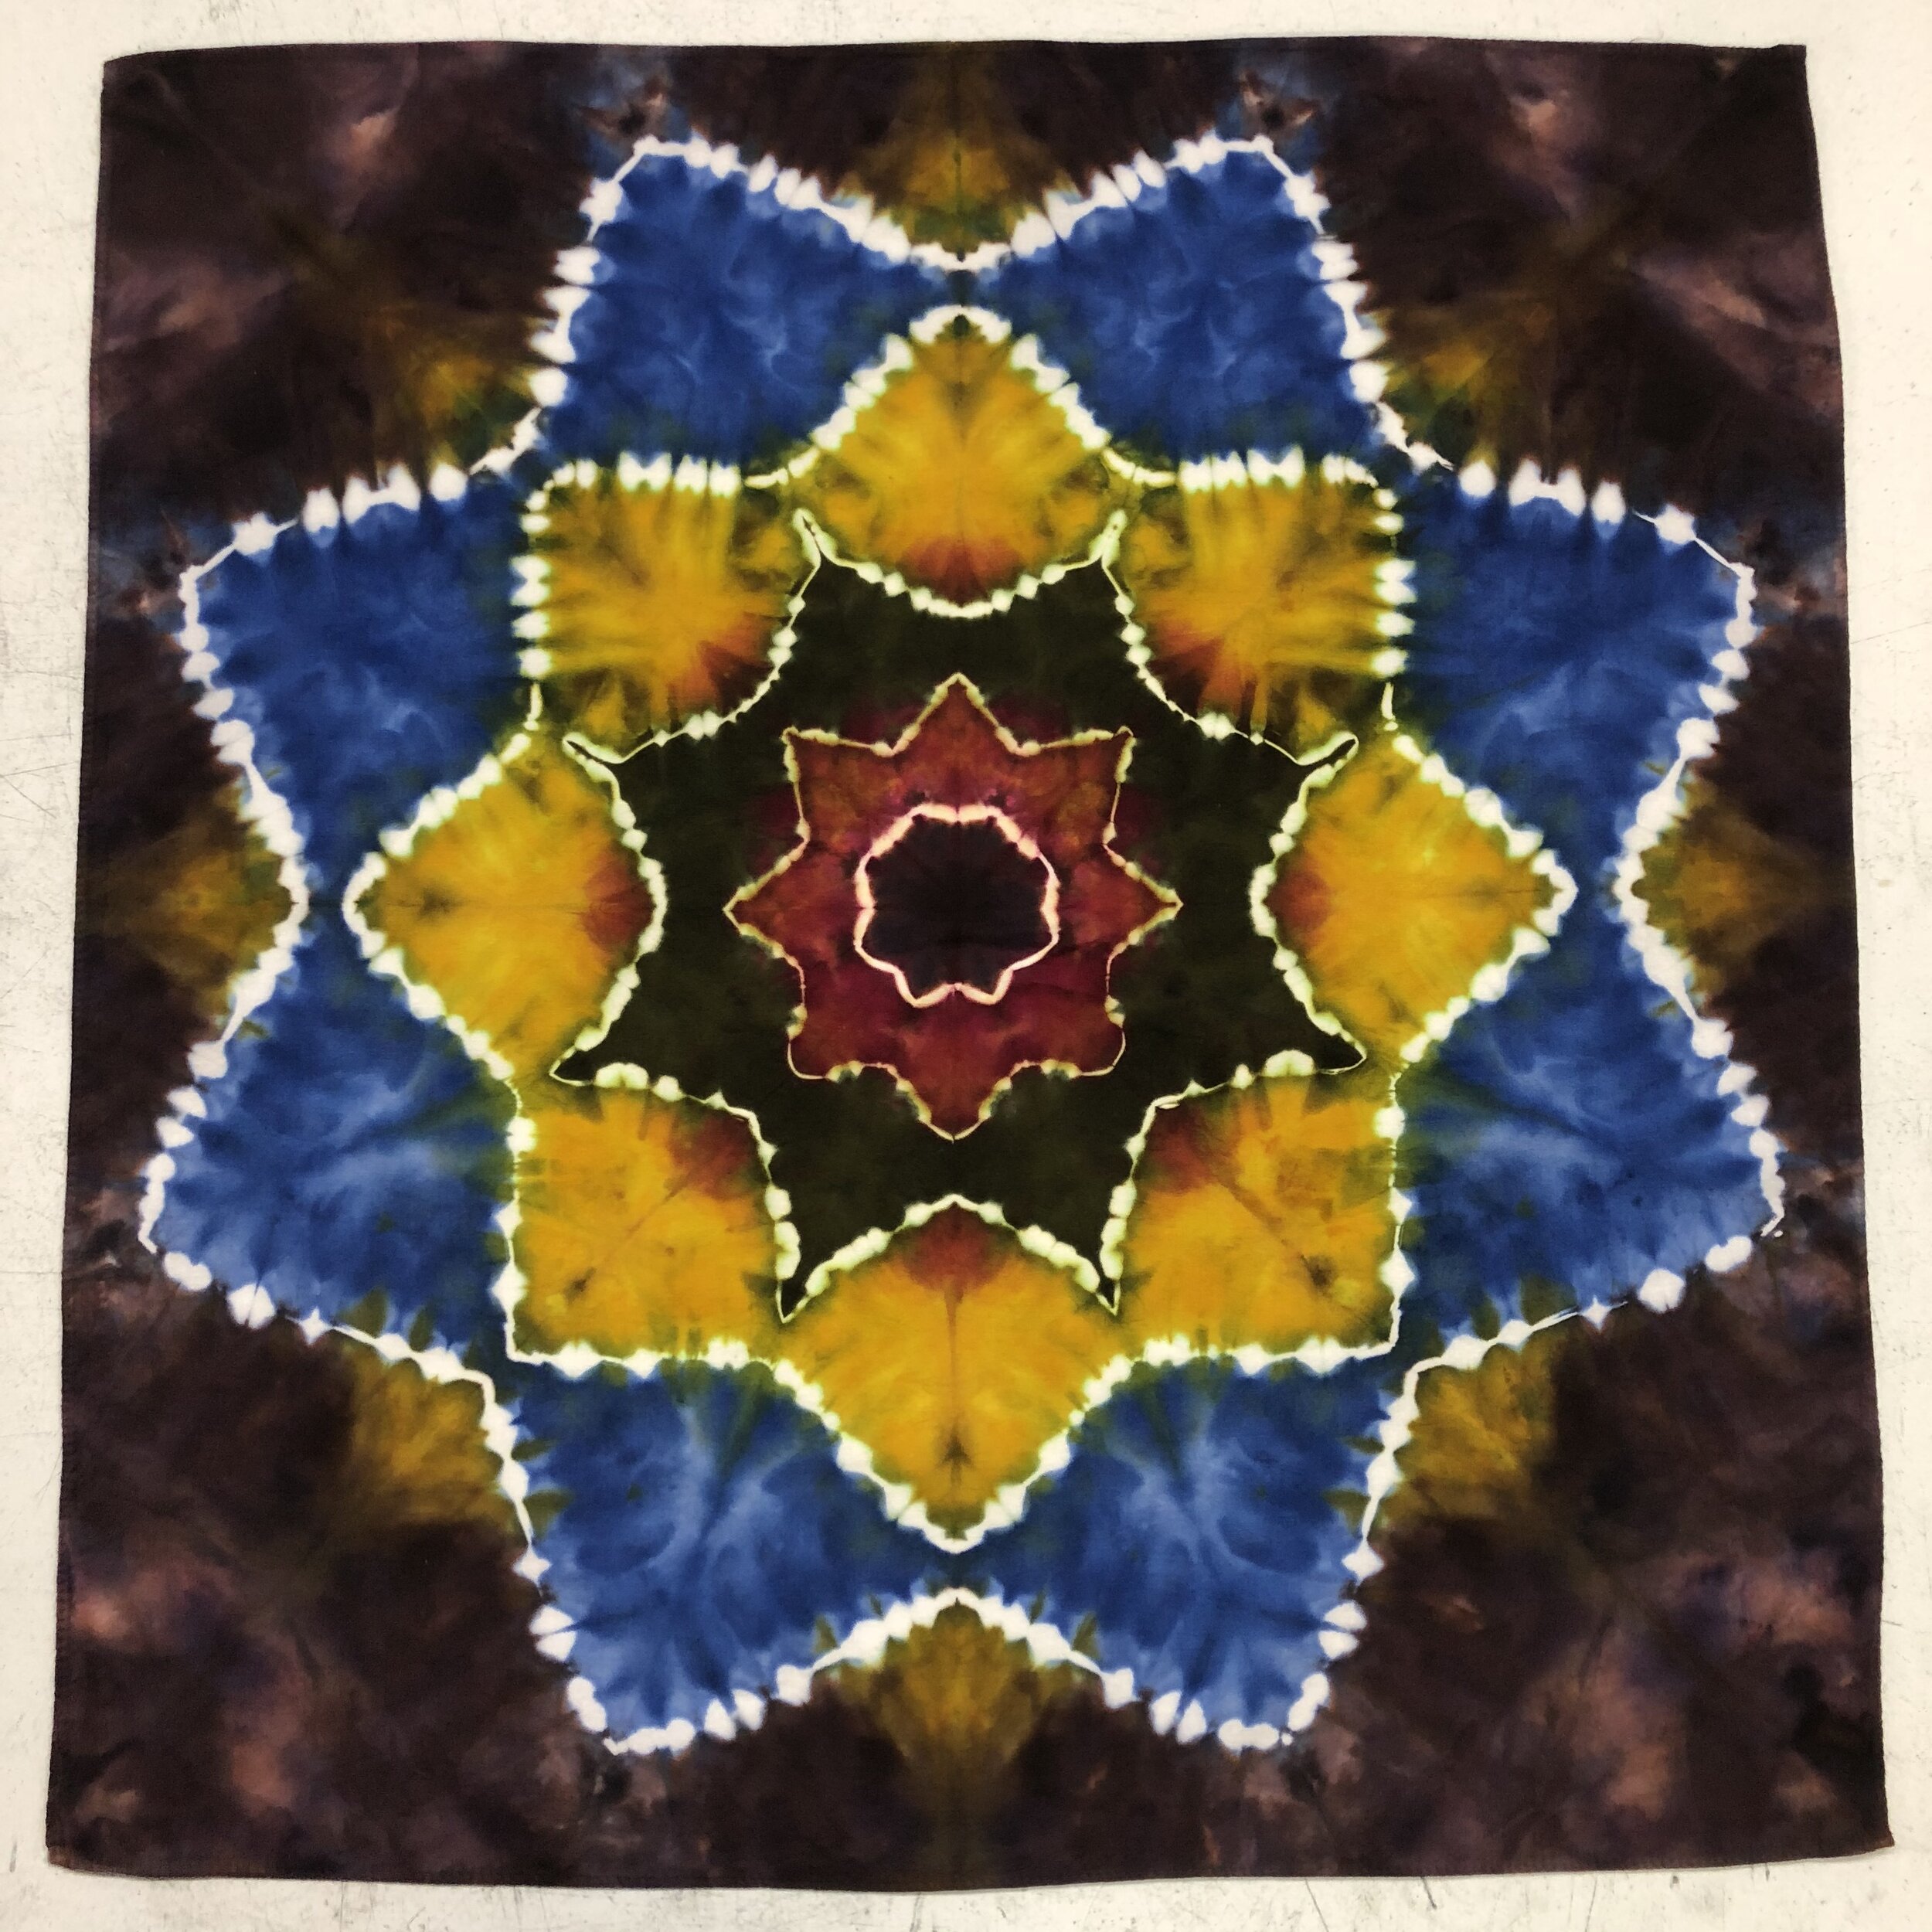
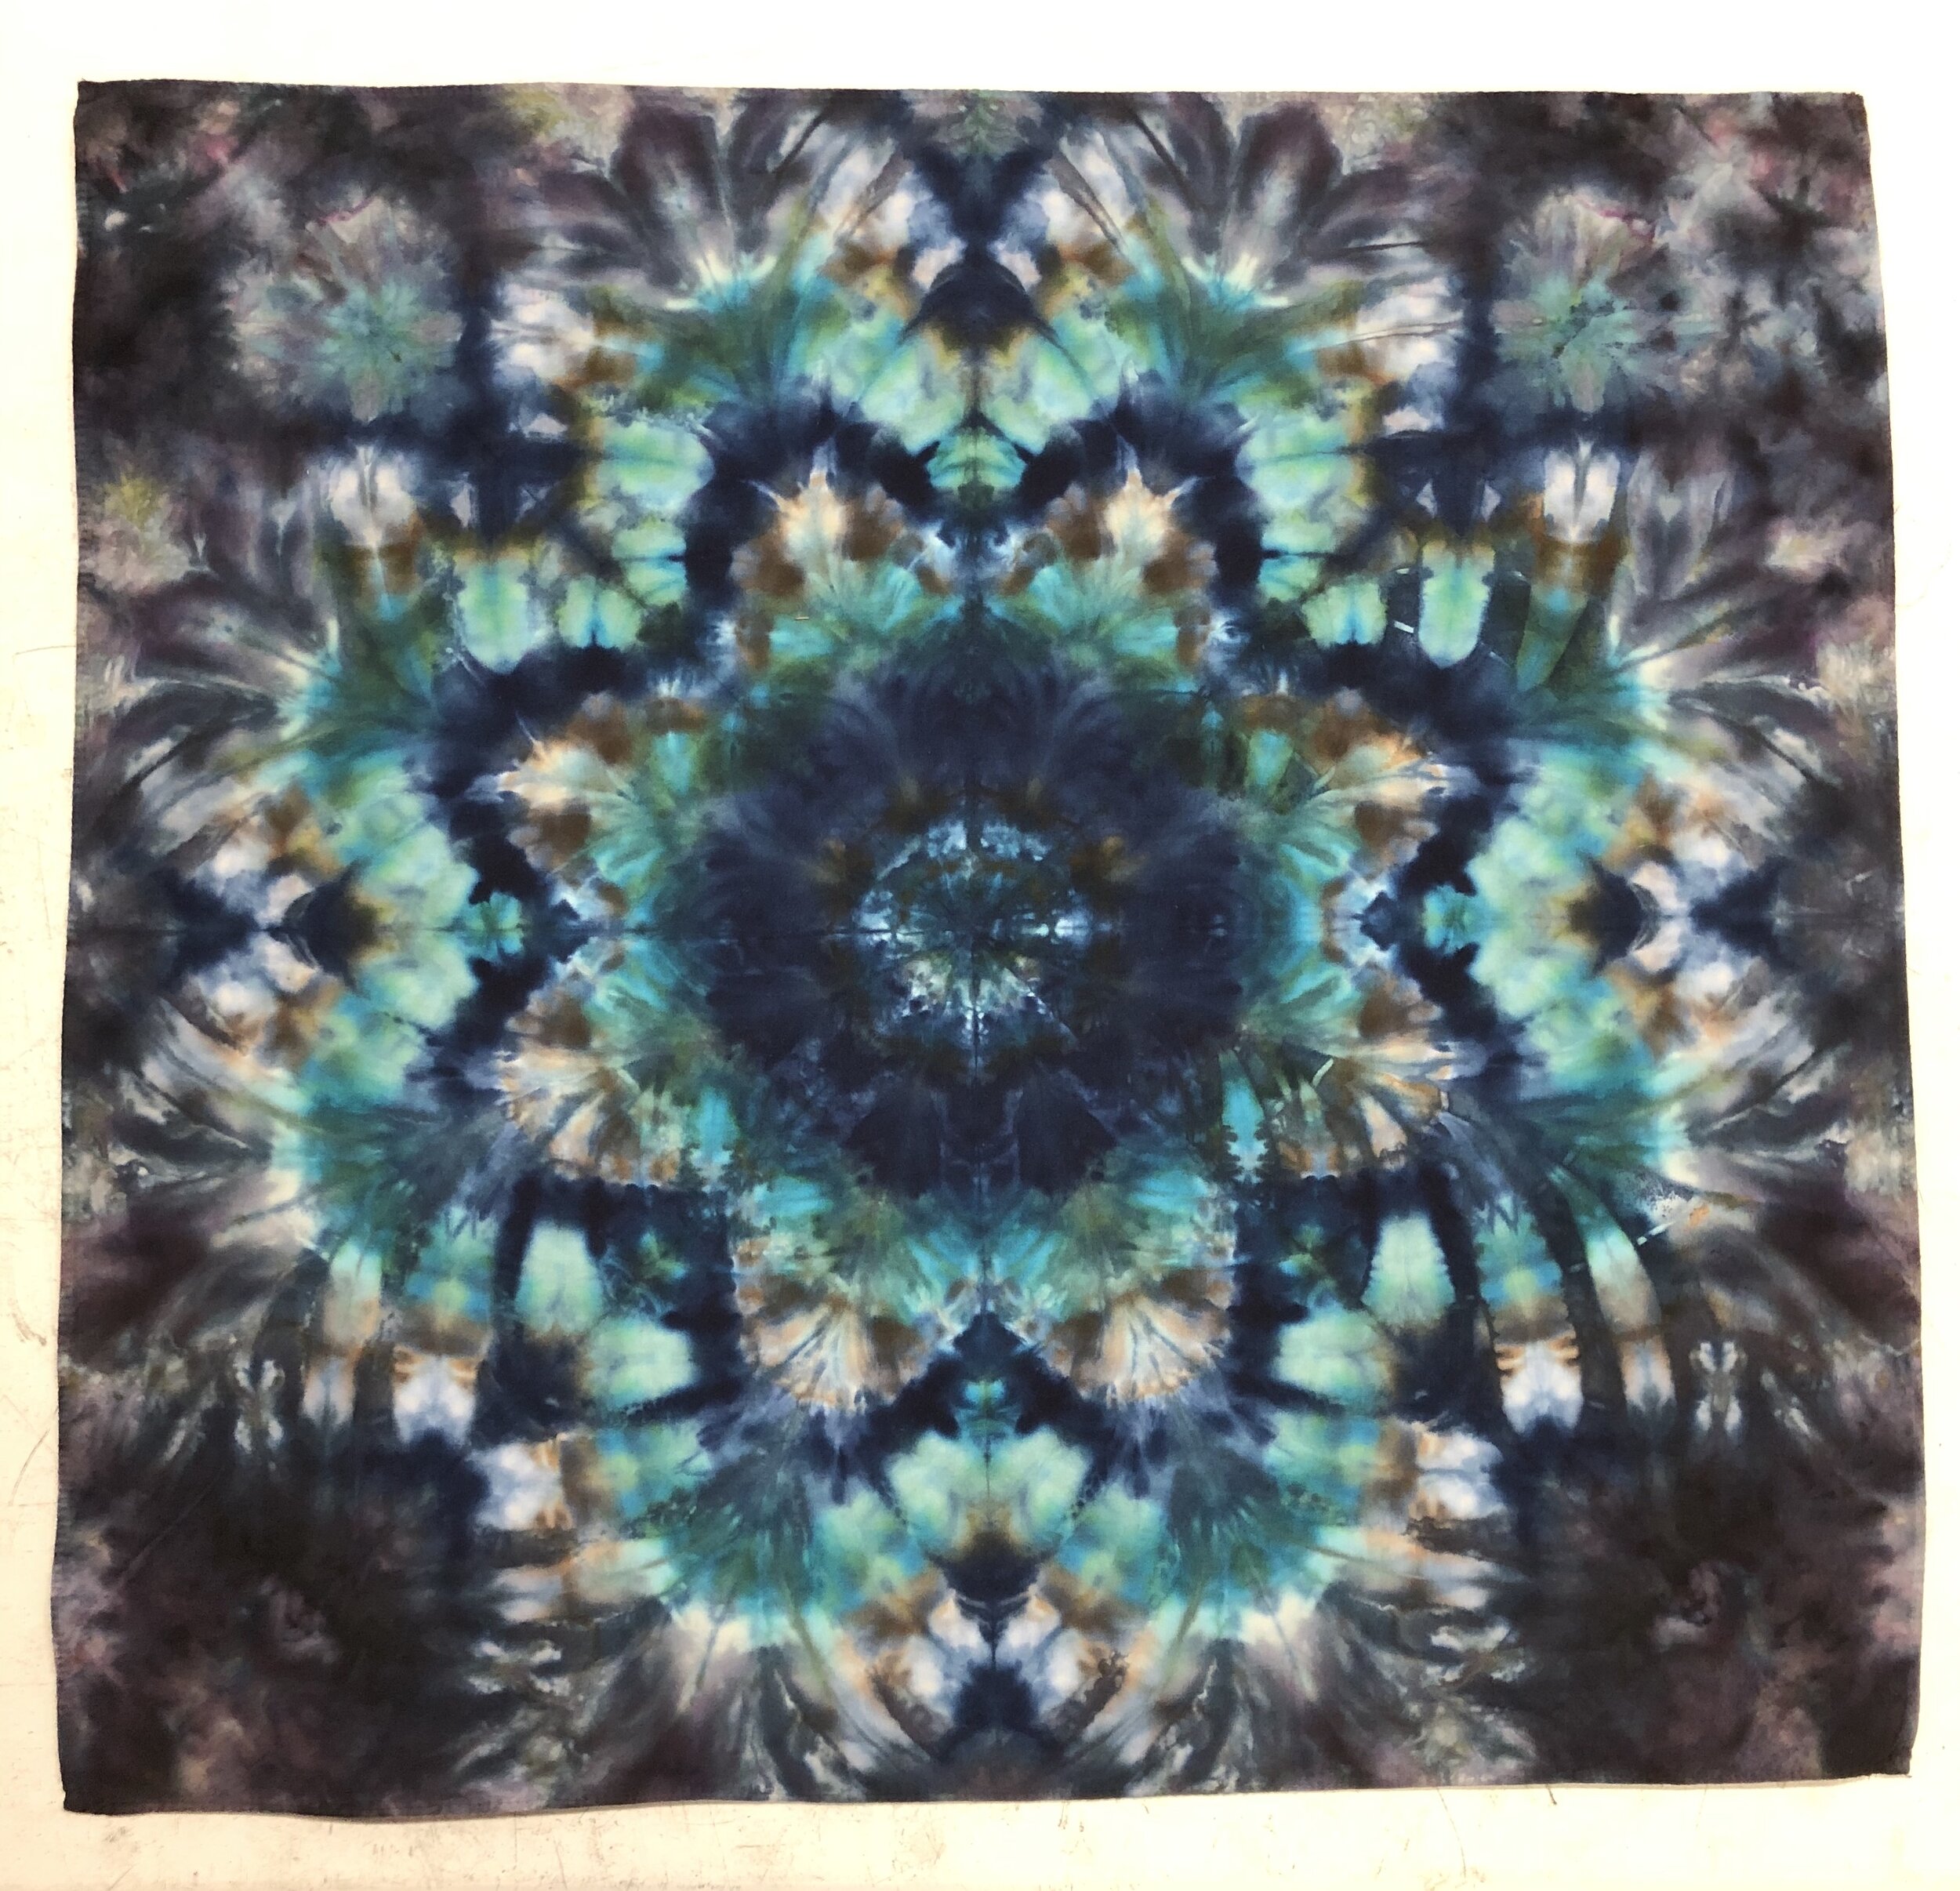
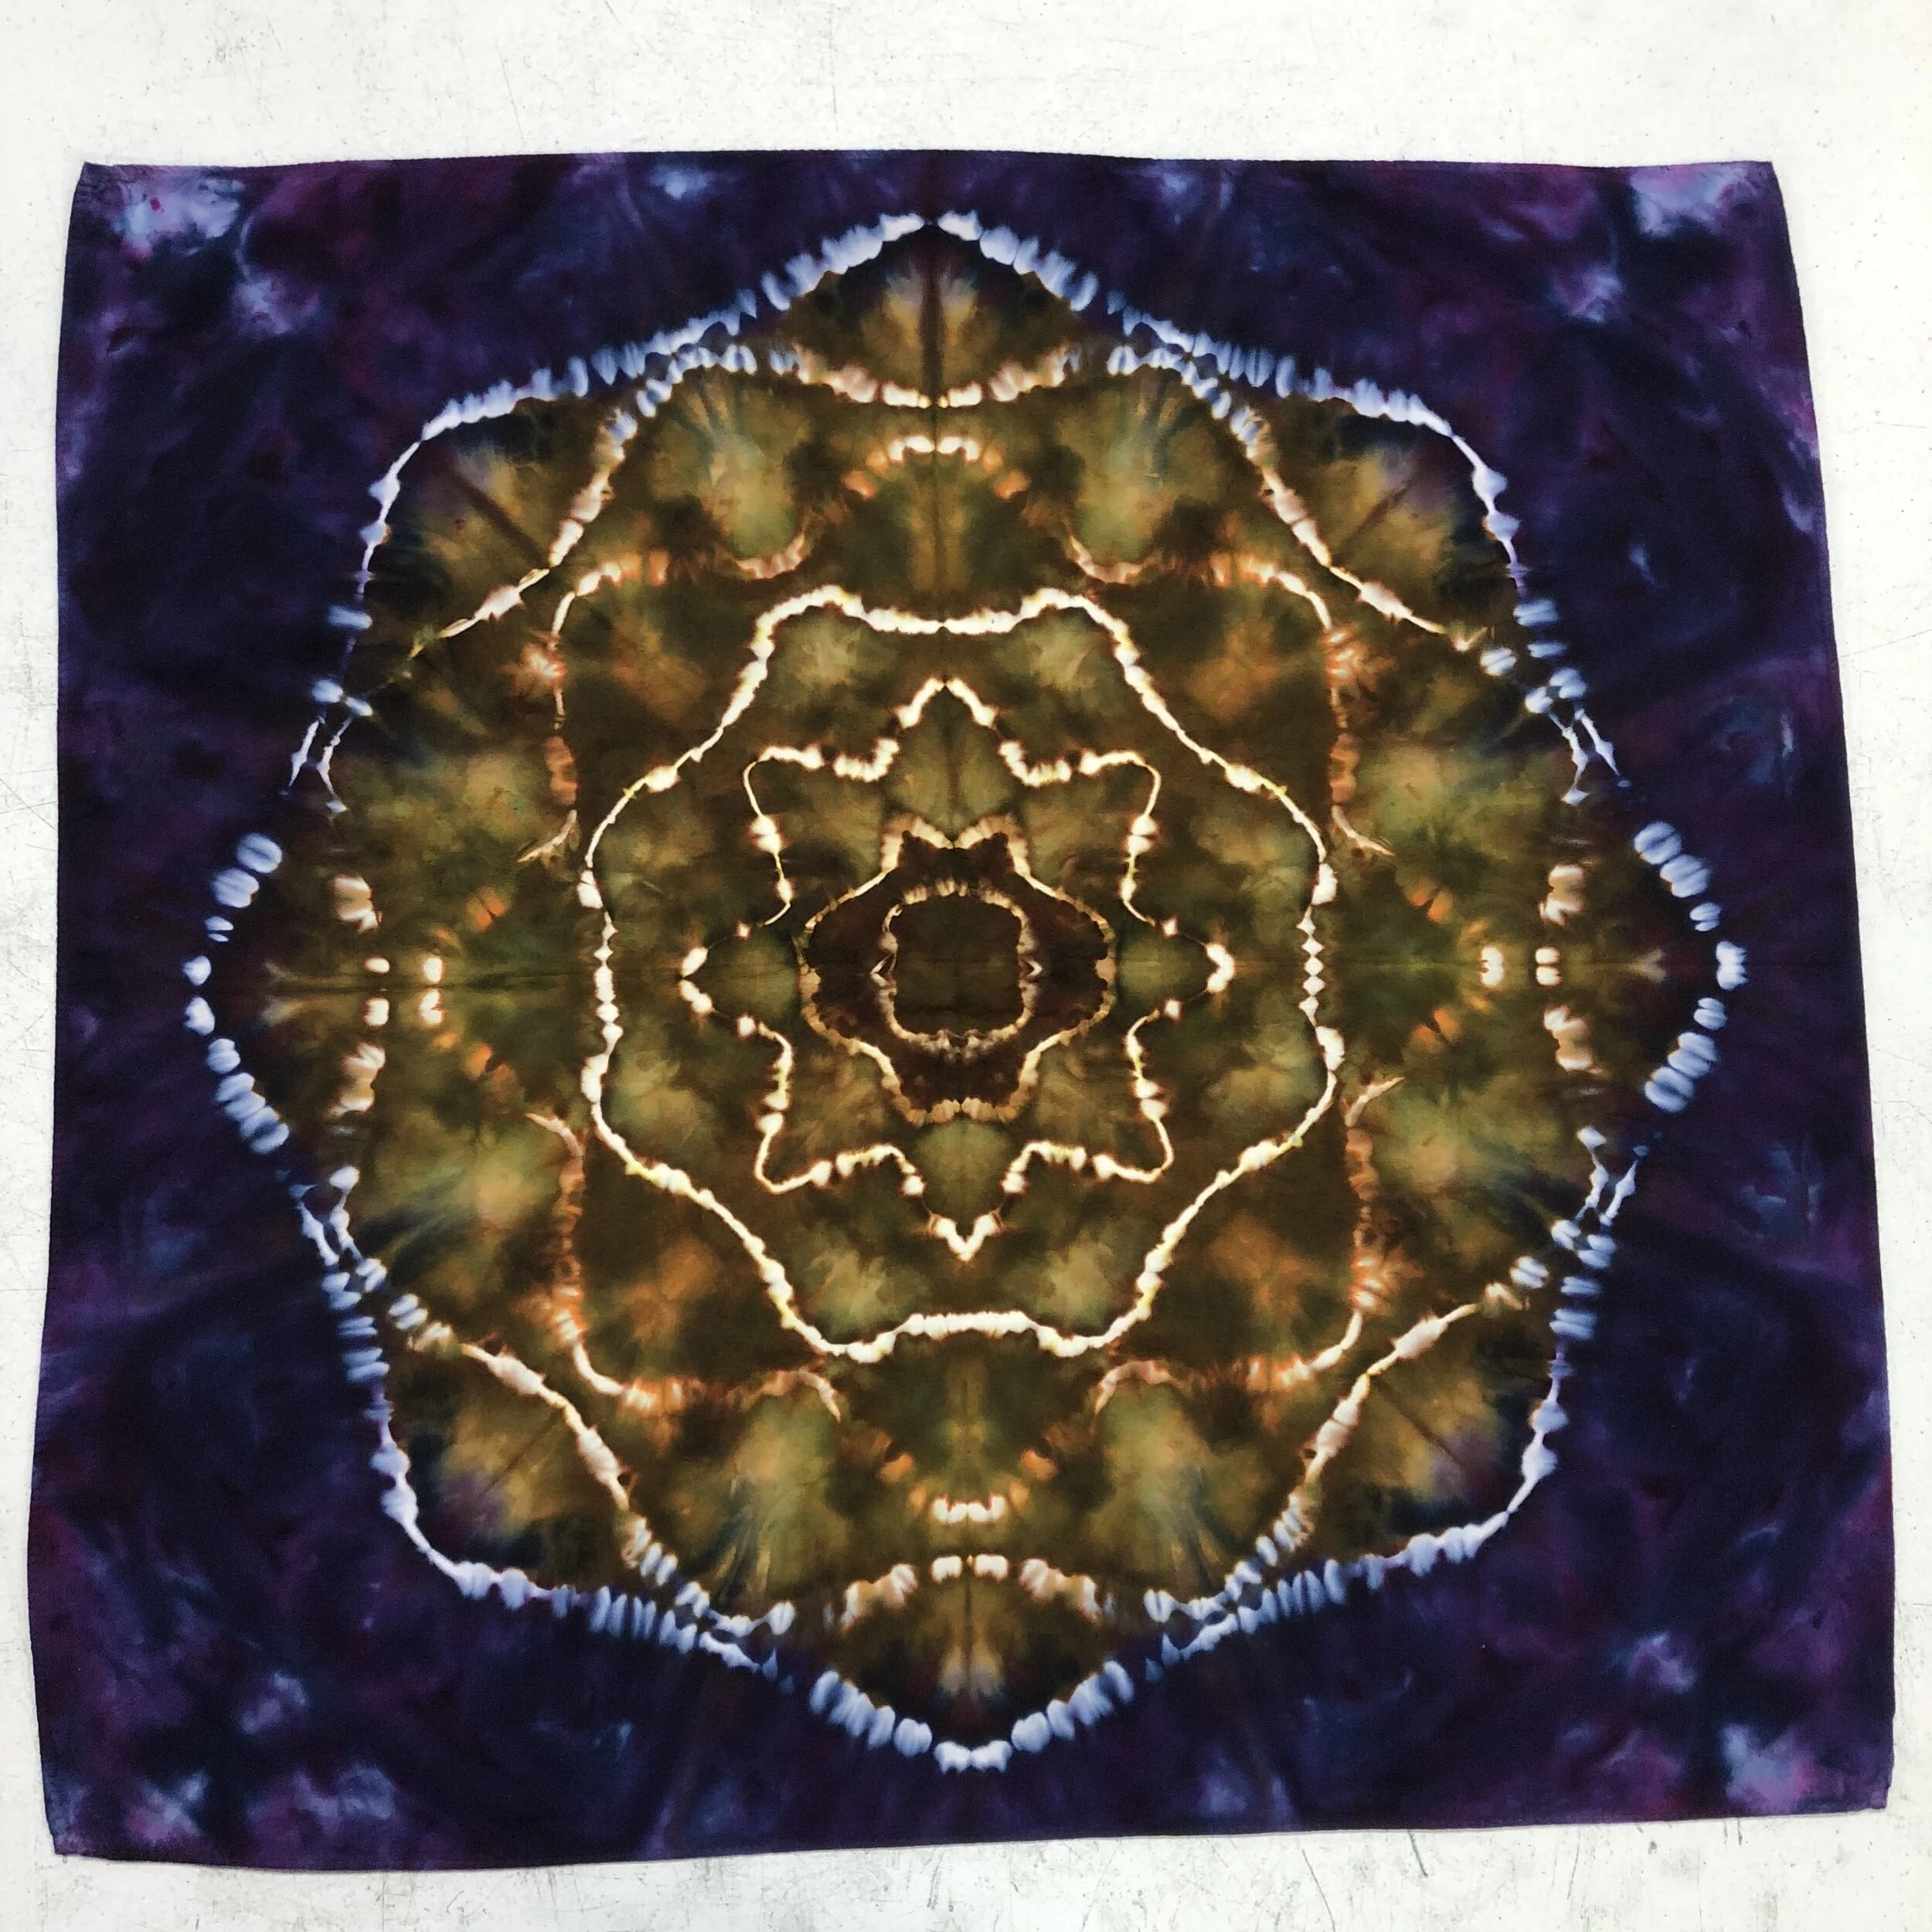
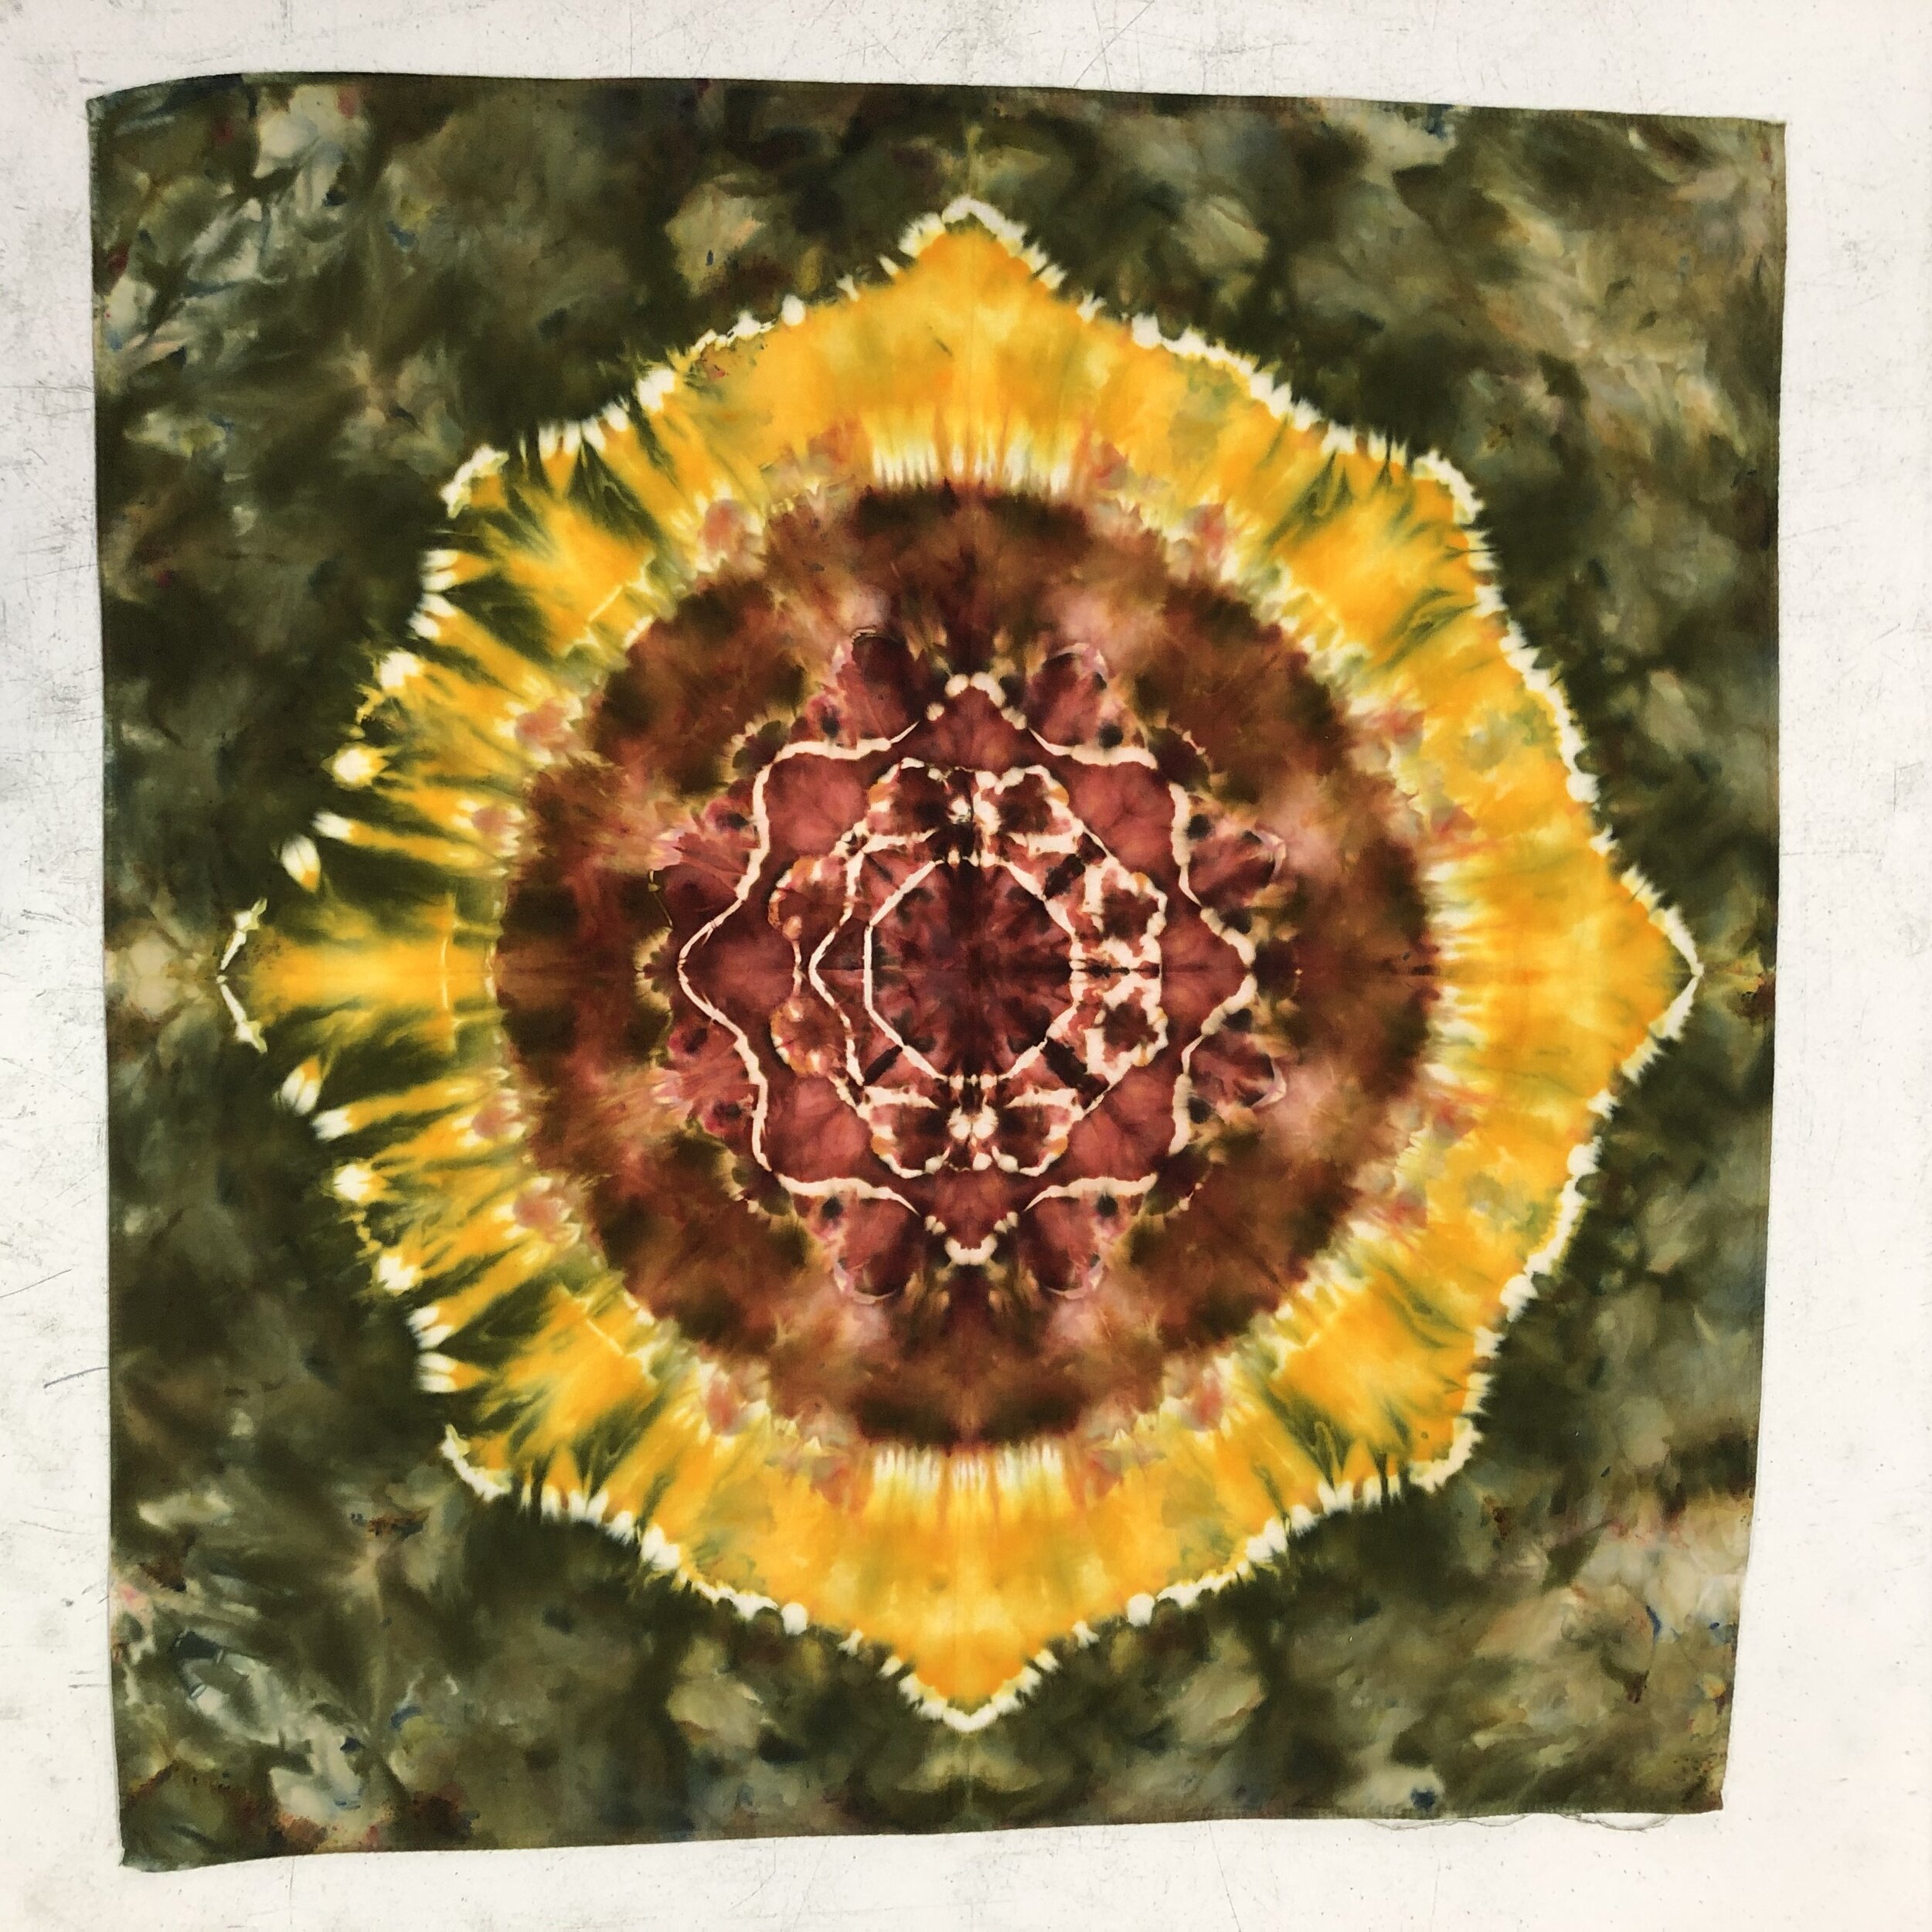
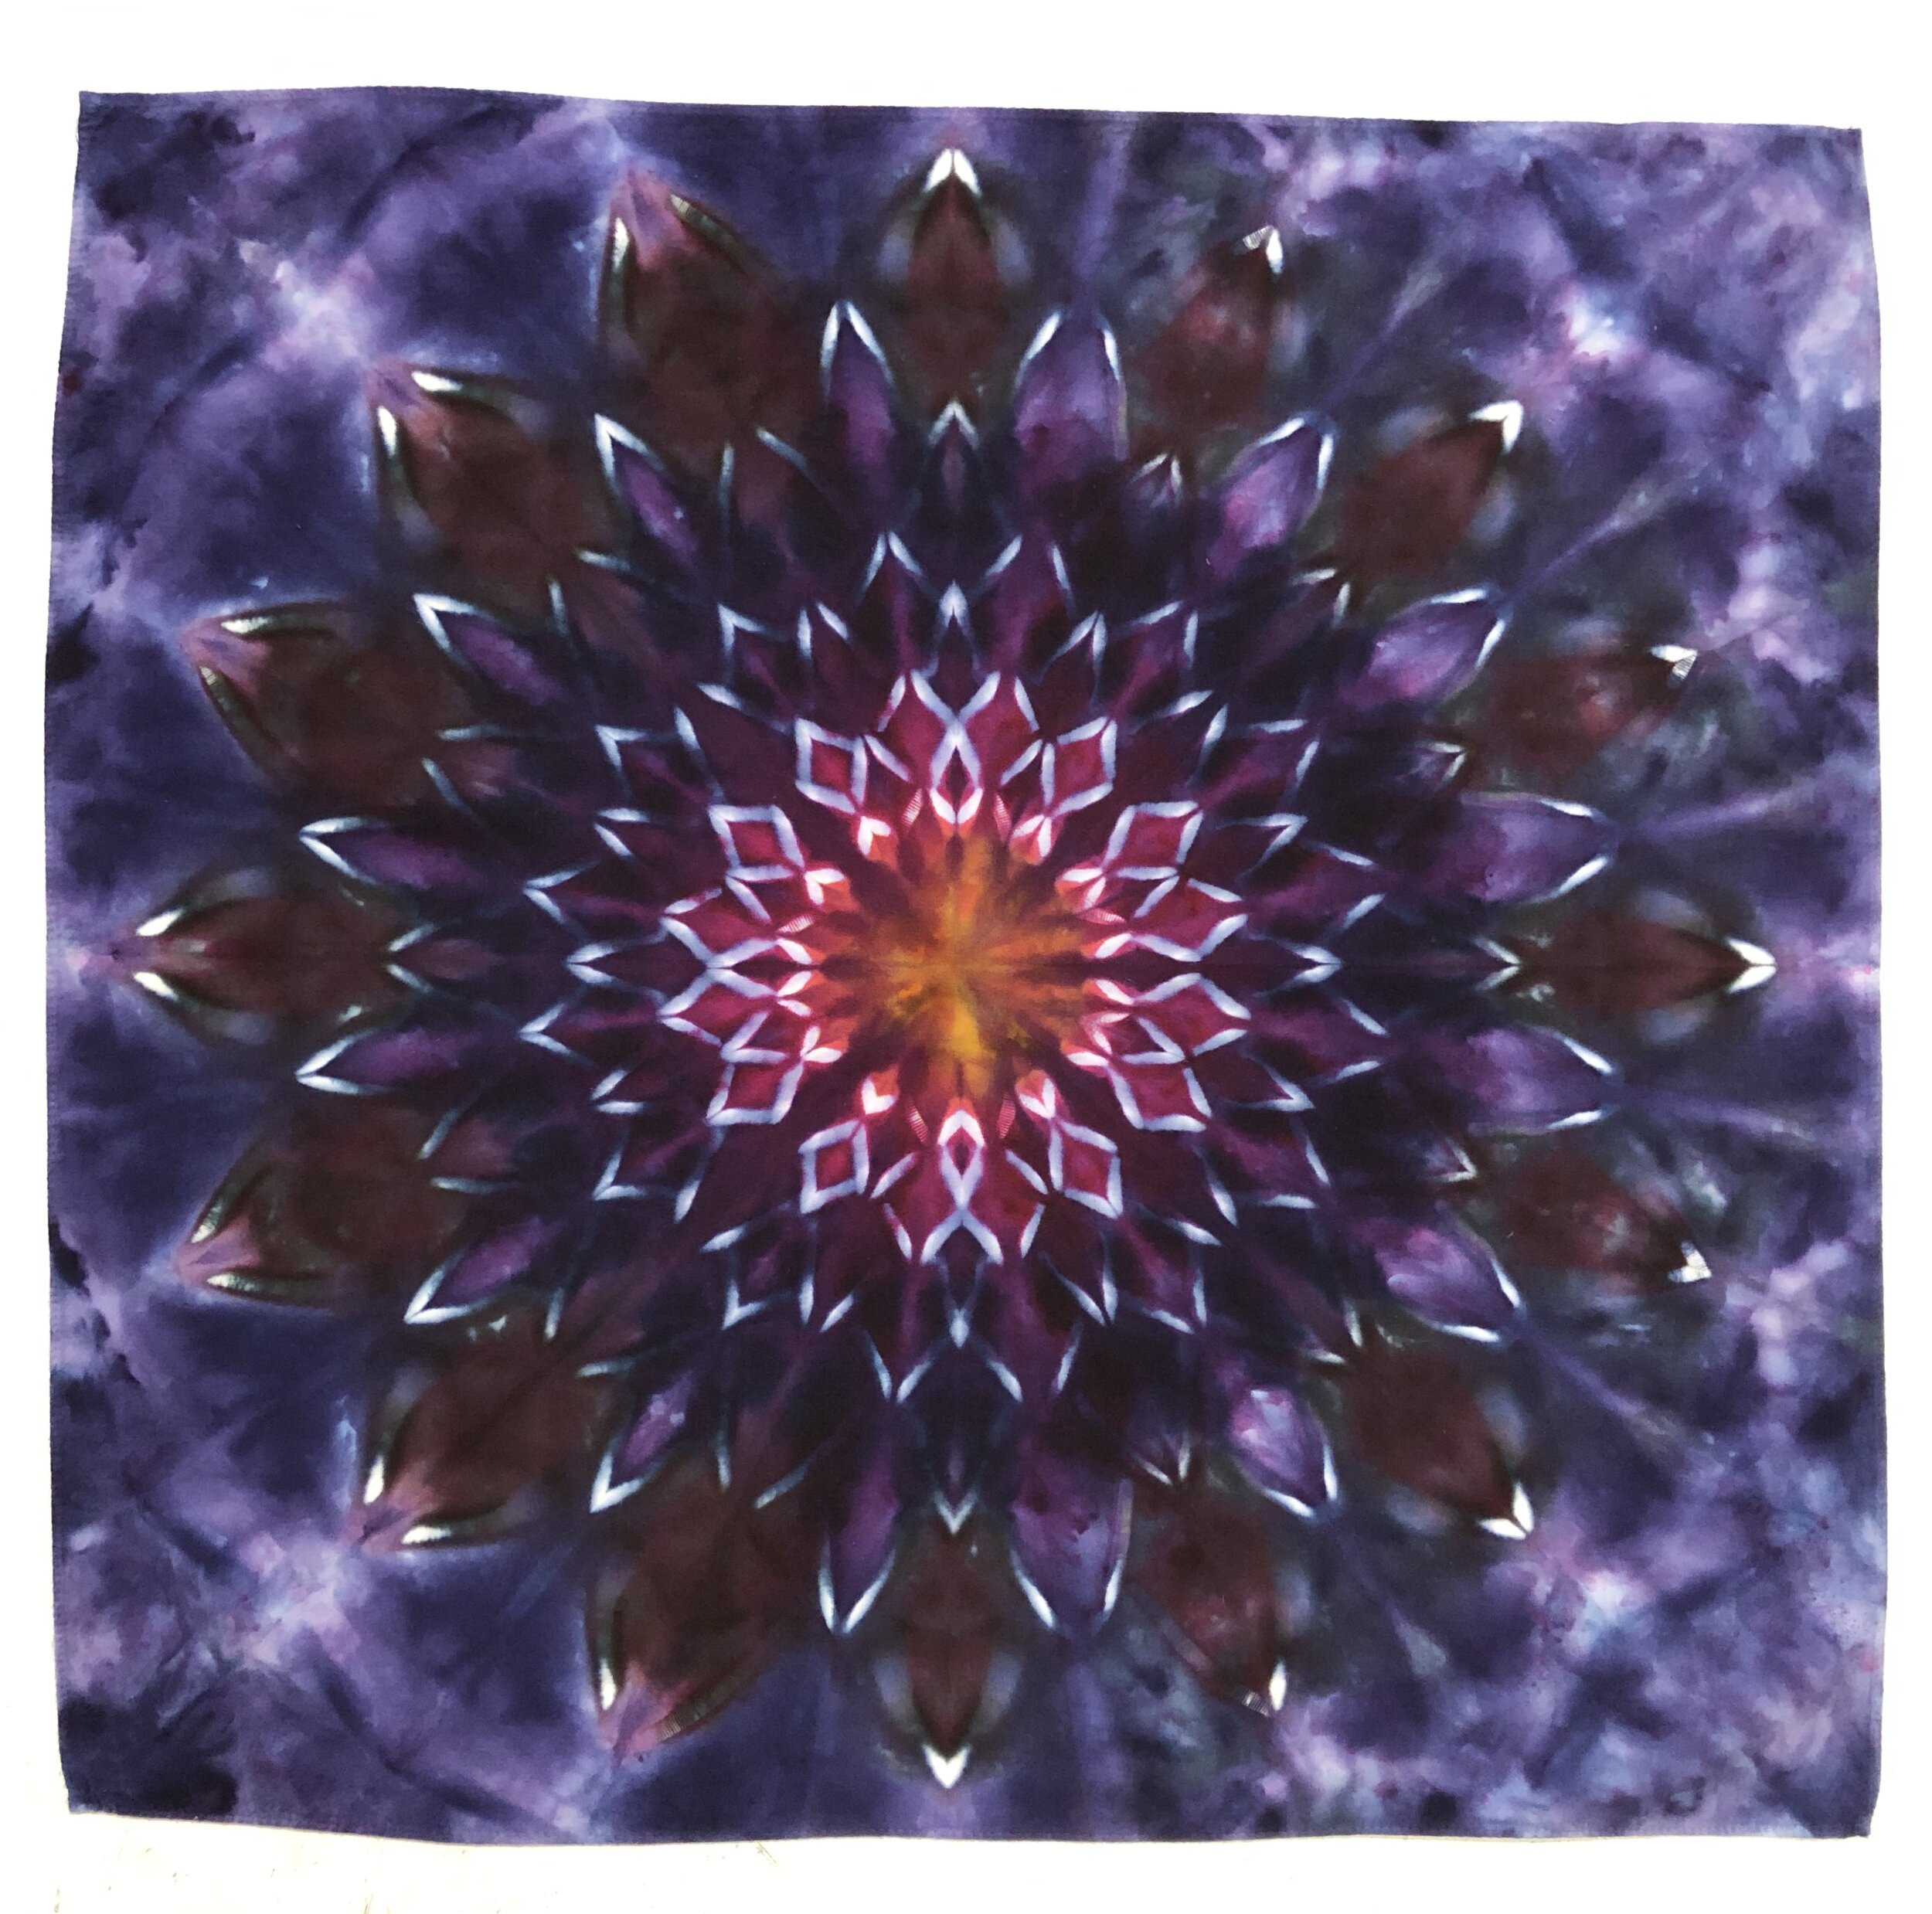
All six of the mandalas below were done at WAXON Studio, on Dharma Trading Company’s 27x27” cotton “bandanas”— we love them for wall hangings, and they’re incredibly affordable. Grab a pack.
What Is a Mandala?
A “mandala” is a shape with repeating elements that grow from/around a central point. Symmetry, tessellations, fractals, and patterns are all found in the hundreds of thousands of mandala art pieces across the world and throughout history.
Mandalas were thought to originally have been created in the service of one of the world's great religions, Buddhism. They were produced in Tibet, India, Nepal, China, Japan, Bhutan, and Indonesia, and date from the 4th century to present. Now they are created throughout the world, including New York City.
Mandalas have long been created with colored sand by Tibetan monks as part of a spiritual/philosophical practice, and that’s how I got my first exposure to them. The Unitarian Universalist fellowship that I grew up in hosted a group of monks and they created a sand mandala in silence on the floor of our youth group room over the course of a weekend.
It was so beautiful, elaborate, and entirely improvised. Then when they were done, it was all just swept away! What an impactful reflection on the nature of impermanence.
Can I Create a Mandala T-Shirt Using Ice or Snow Dyeing?
I believe that an ice dyed mandala is the best possible form. Of course, I’m biased, because I do all my mandalas with ice. Well, almost all of them.
There are some times when liquid dyes are desired for coloring parts or all of certain mandalas, but I have found that with liquid dyes it’s harder for beginners to get full saturation deep down into the folds, giving them too much undesired “white space.” Ice dyed mandalas are a thing of beauty, and if it’s the season for snow, why not try that as well?
You can experiment with different ways to dye mandalas all year long. Never ice dyed? Want some pro tips? Read up on DIY ice dyeing or take our Intro To Ice Dyeing online course.
Do I Need Rubber Bands for Mandalas?
I strongly prefer (and recommend) using artificial sinew (or “faux sinew”) to tie your mandalas instead of using rubber bands. As you’ll see, the lines of the mandalas need to be bound at an angle, and it’s actually much harder to get those lines to stay at an angle when using rubber bands.
Learning to use sinew has its own set of steps, of course, but I’ll add in all my favorite tips below. The tighter you tie, the clearer & brighter your lines will be!
My best tip is to use something strong to help you pull the sinew extra tight. Your hands will thank you.
Of course, sometimes you want a softer edge (or no border at all) between sections of your mandala… and rubber bands are great for that. You can also use surgical hemostats to clamp the lines of a mandala and then you don’t have to bother tying them at all.
Are Mandalas and Kaleidoscopes The Same Thing?
As with most folk art forms, there are about as many different names for tie dye patterns as there are people who make them. Mandalas, stars, kaleidoscopes, dream catchers… depending on who you ask, you might be talking about totally different patterns or the same exact pattern.
Names of things are very subjective, and they vary a lot from person to person and place to place! When in doubt, show or ask for pics of the pattern you’re talking about.
Items That Work Well For Ice Dye Mandala
Below we will discuss the different fabrics that are best for creating ice dye mandalas. The list isn’t extensive, but it contains some of the most common items people tend to tie dye.
T-Shirts
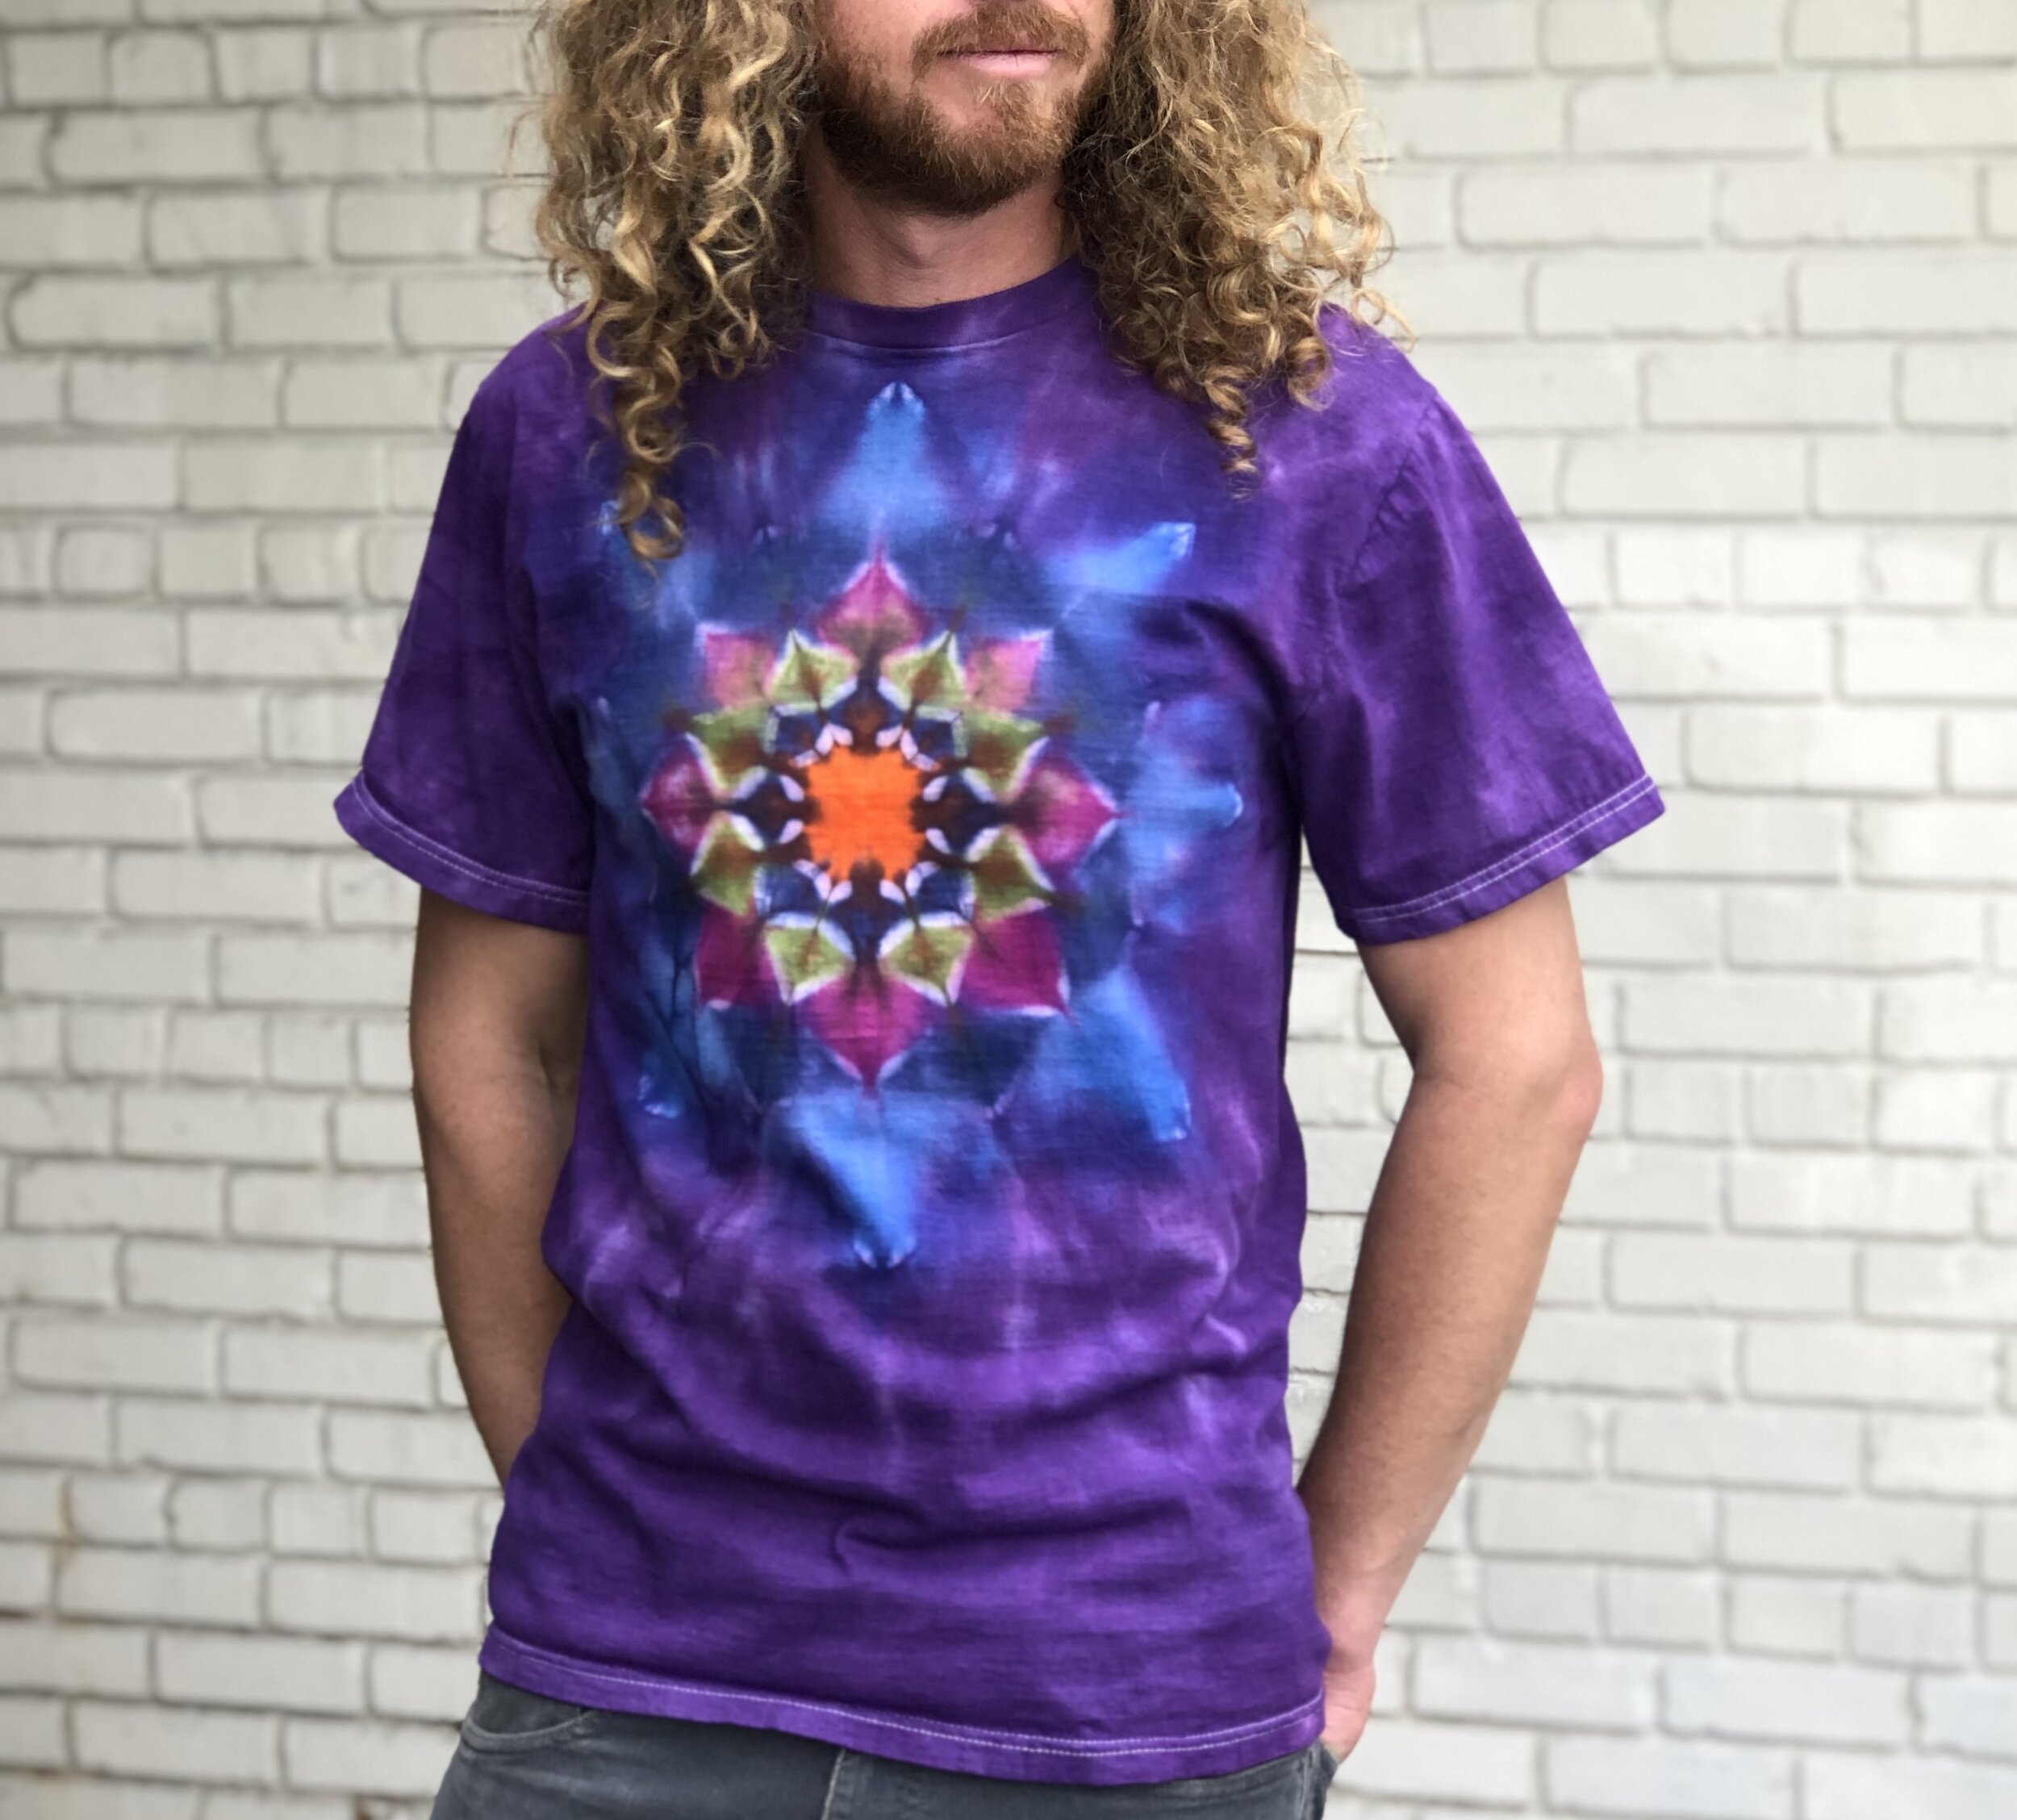
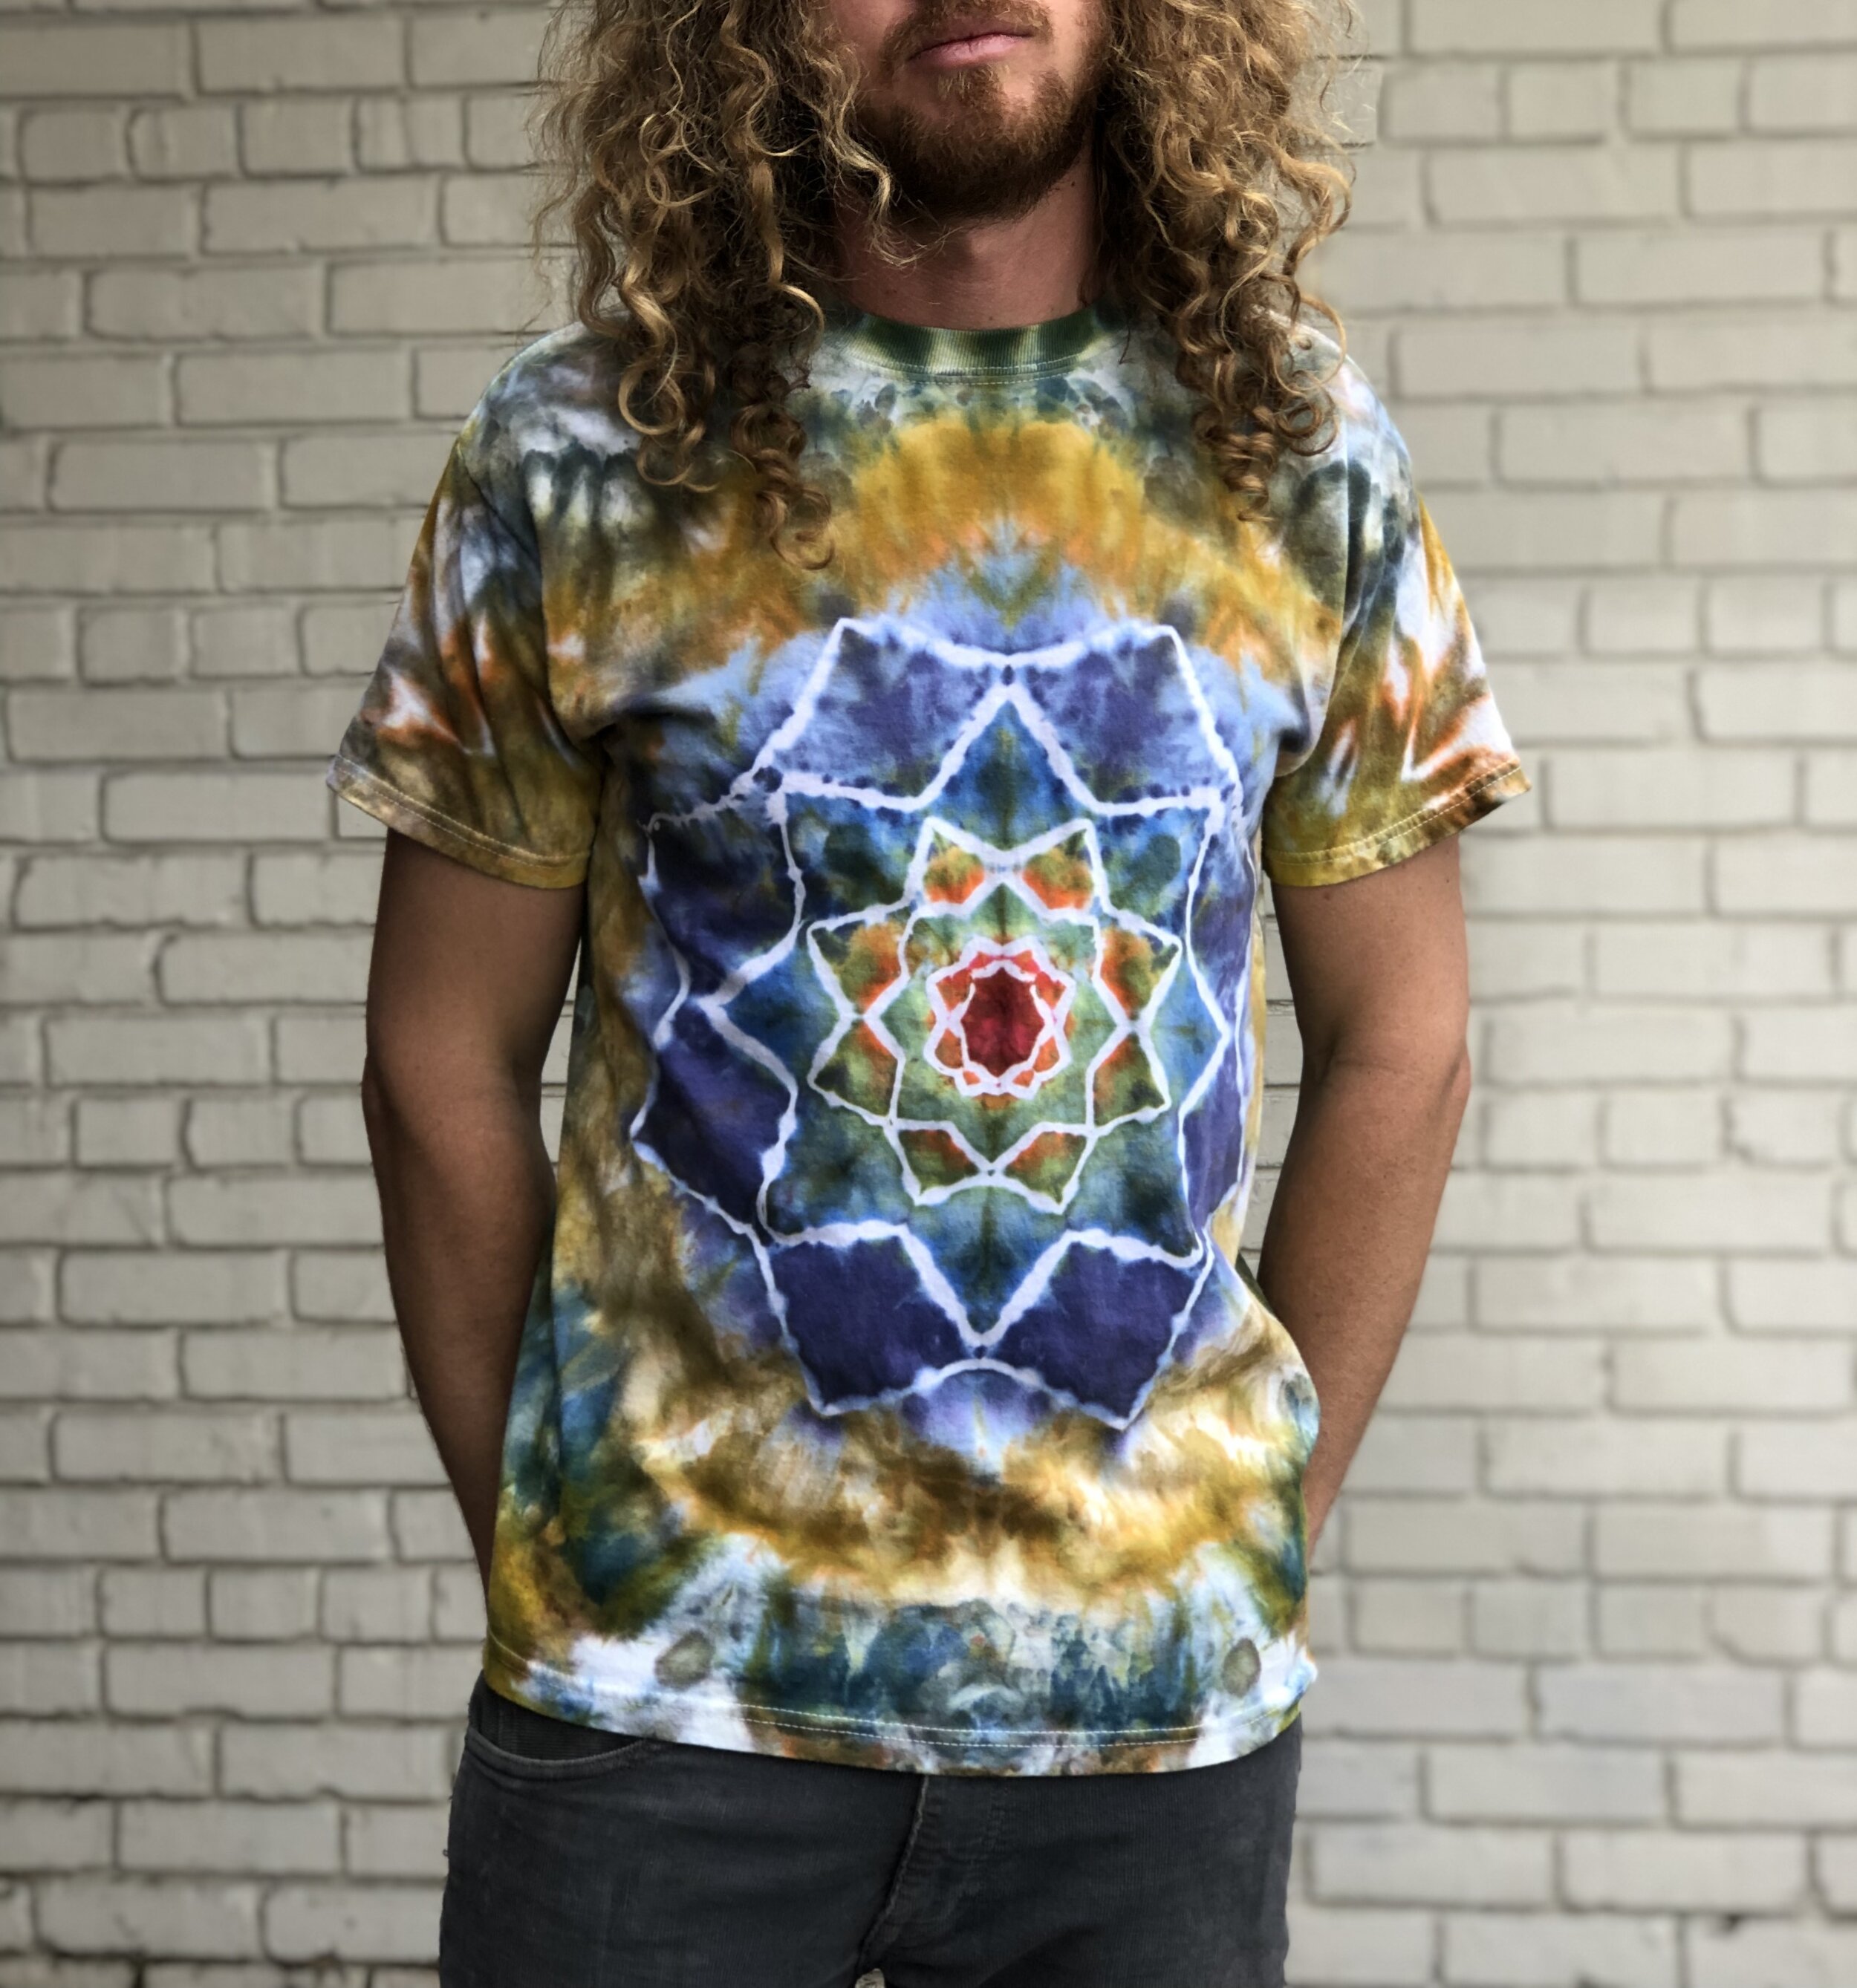
Mandalas are folding patterns that are created on a single layer of cloth, so if you want to put one on a shirt or other garment, you’ll be creating it on the front layer only. My advice: practice on flat pieces (sheets, tea towels, cloth napkins, handkerchiefs, bandanas) until you get the hang of it, and then try putting one on the front of a shirt!
Here are two types of mandalas, a liquid dyed and hemostat-clamped on the left, and an ice dyed sinew-tied one on the right. They are only on the front of the shirts!
The backs are plain, or scrunched, or accordion-folded up the spine. Pick something easy and focus on your fronts if you want to practice on wearable garments.
Note: these shirts were sewn with polyester/nylon thread, and the hems around the arms and hips are still bright white. For extra professional results, dye on shirts that were sewn with cotton thread, so the stitching will dye to match. It’s a small point of snobbery, but one I feel strongly about.
Tapestries
A tapestry is a great choice for mandalas because it’s only a single layer of cloth, and there’s no back-side of the shirt to worry about. I do recommend starting small at first, rather than going right for a super huge tapestry, because tie-dyed mandalas really do take some practice!
It is so much easier to practice on something smaller that you can fit right on the table in front of you. Once you’ve got the steps memorized and you’re getting great results, search your local thrift stores for some 100% cotton top sheets (or cut the elastic off of a bottom sheet).
A really big sheet can be cut into quarters to make 4 tapestries! Used cotton is great because the fibers have been beat up in the wash many times— I think that washed cotton takes the dye better than brand new cotton.
Here’s a reveal video of a BIG 8-pointed mandala, ice dyed and tied with sinew! This is on a piece of a thrifted bedsheet, and was made as an installation piece for a friend’s camper van.
This quickie phone video is from September 2020, showing an 8-pointed mandala.
Other Flat Types of Blanks
What are some other “flat” (single layer) pieces you can think of? Like bed sheets, tea towels, shawls, cloth napkins, handkerchiefs, bandanas… comment at the bottom of this post, it would be fun to collect everyone’s ideas!
Here’s a video, for those who prefer to watch instead of read!
How To Ice Dye Mandalas: Folding Technique
Here are the actual folding directions. First, we’ll fold, then we’ll tie. Then we’ll dye. I find it helpful to see these steps demonstrated with a little zoom-into-the-future aspect added.
I’m showing you steps on a bandana I actually already dyed! That way not only are you learning the steps, you’re seeing how the folds you’re making are actually going to be creating the sections of color.
I hope it’s helpful for you visual learners. This bandana was bottle dyed (liquid dye).
These steps are for a basic 8-pointed mandala. You can repeat steps for a 16-pointed mandala! The larger your piece of fabric, or the thinner the fabric, the easier it is to do 16-points. Please start with 8 points until you get the hang of it.
Steps 1 & 2: The Two Main “Lines of Symmetry” (aka fold into quarters)
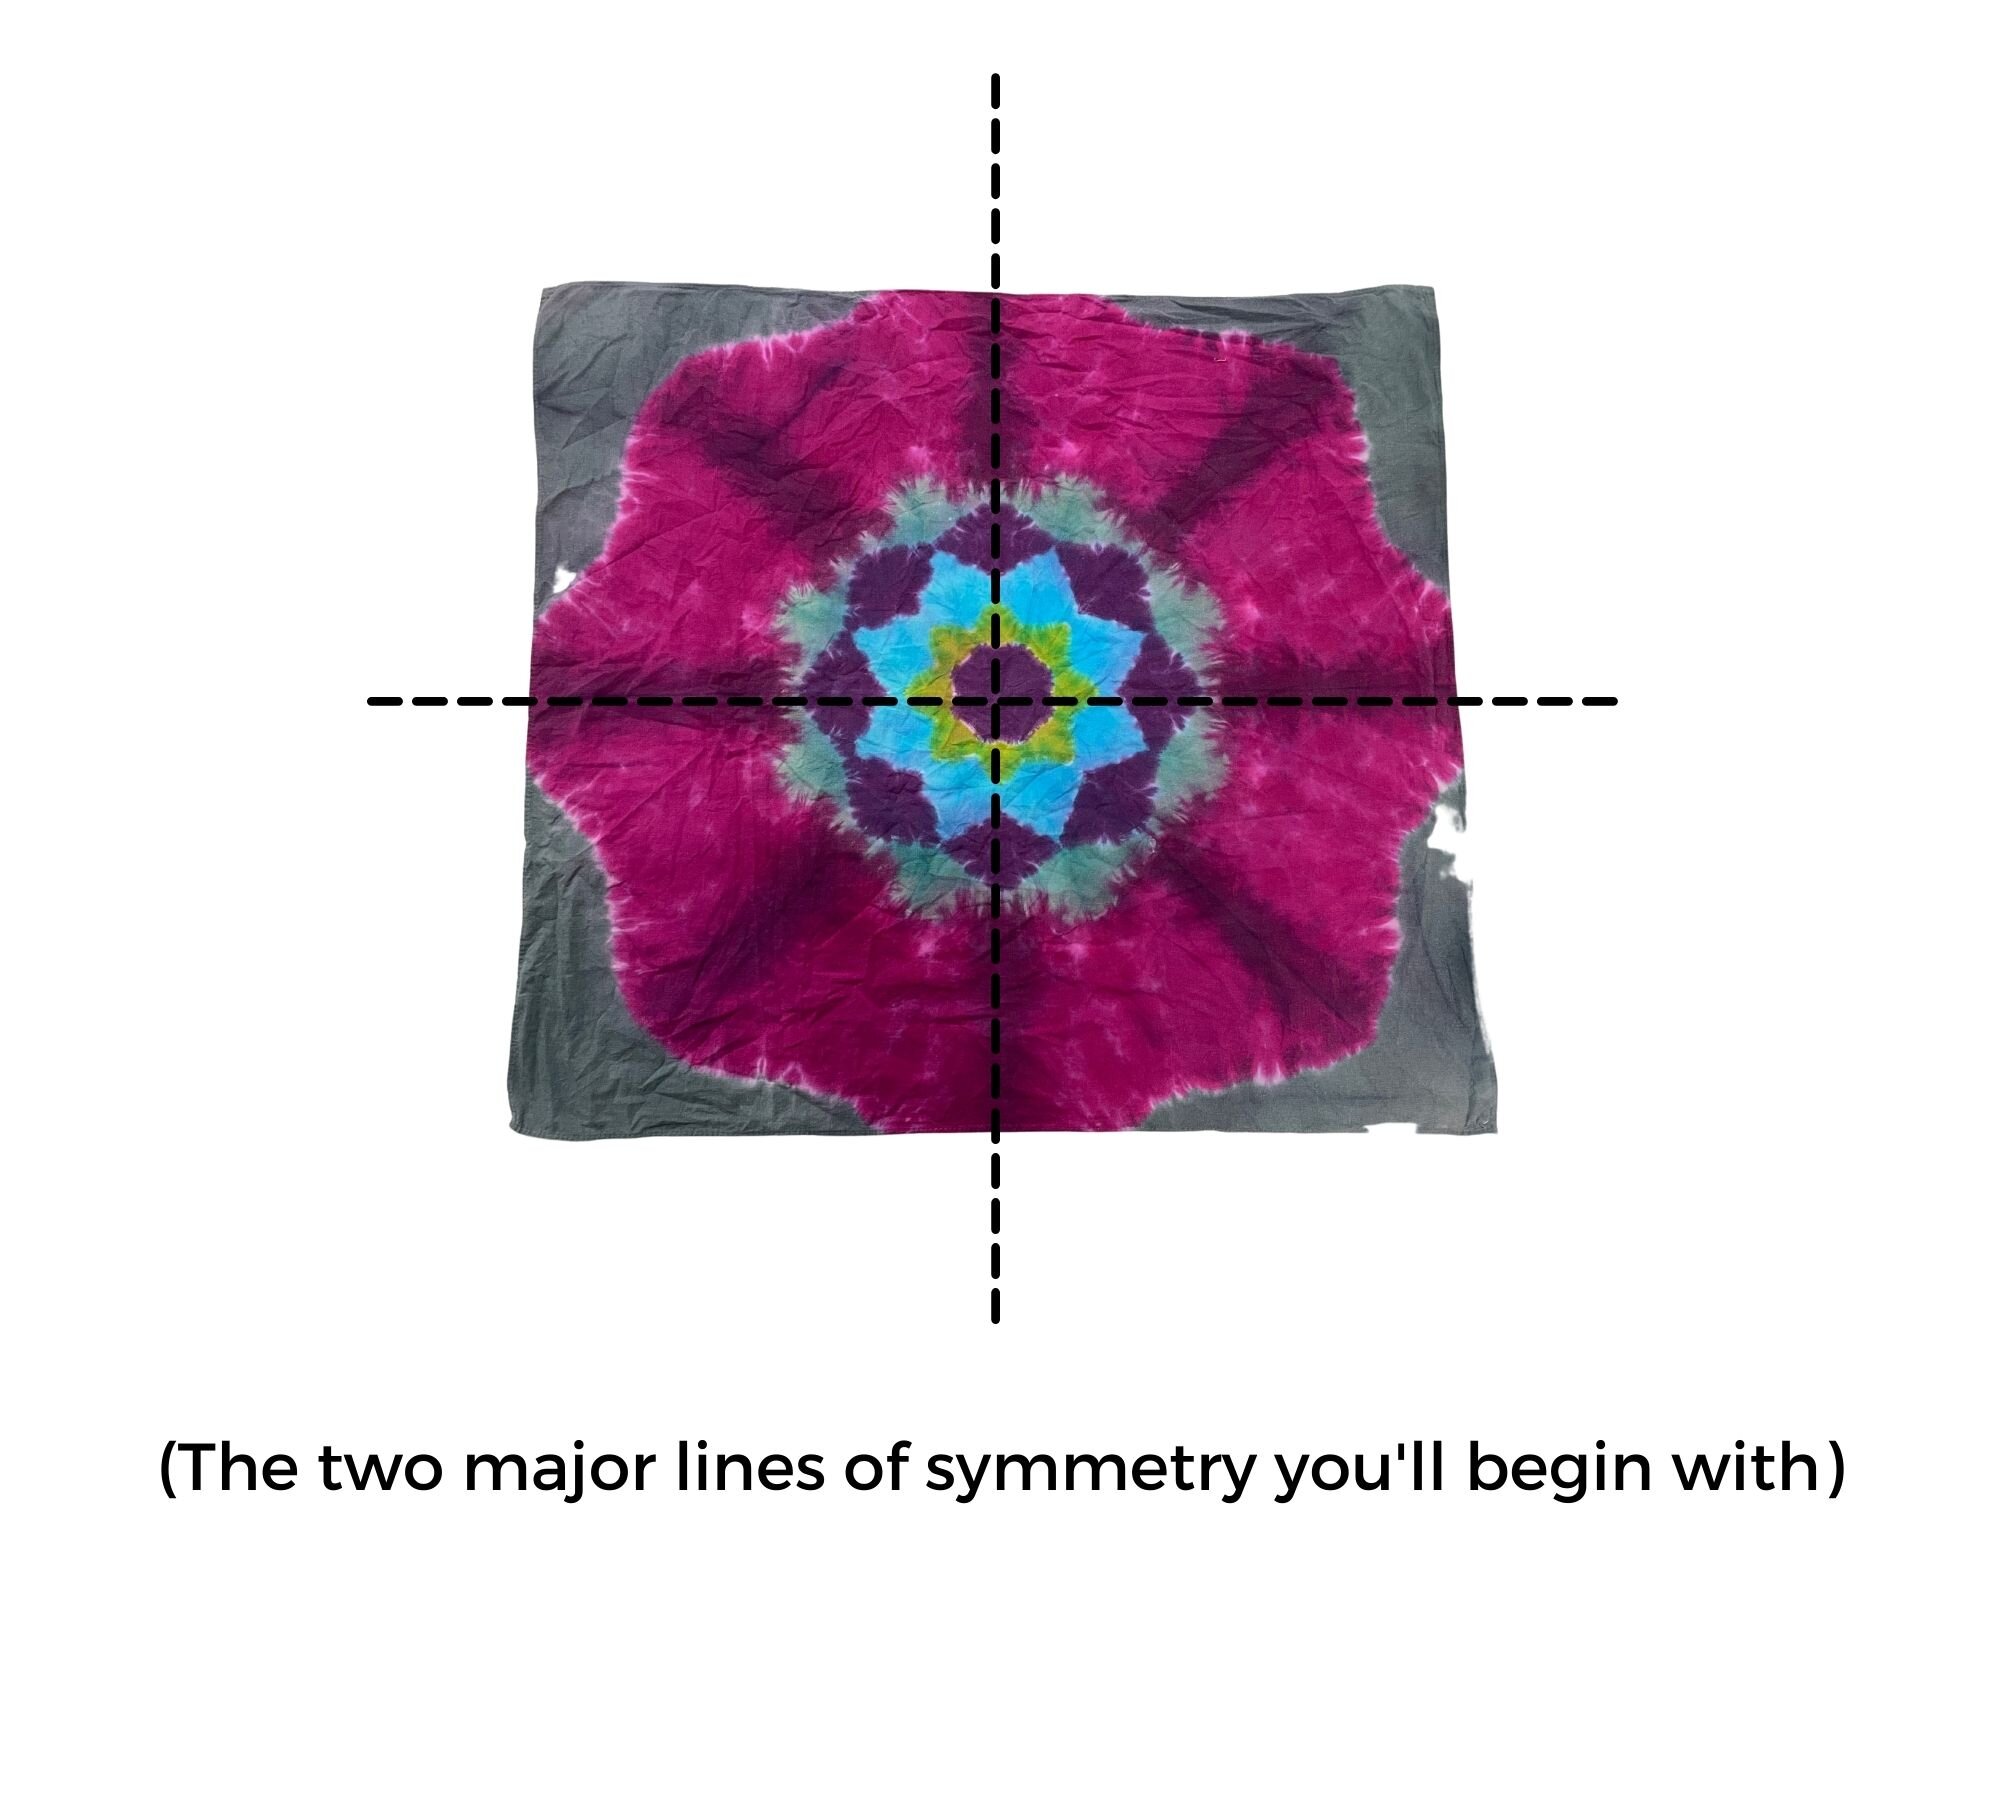
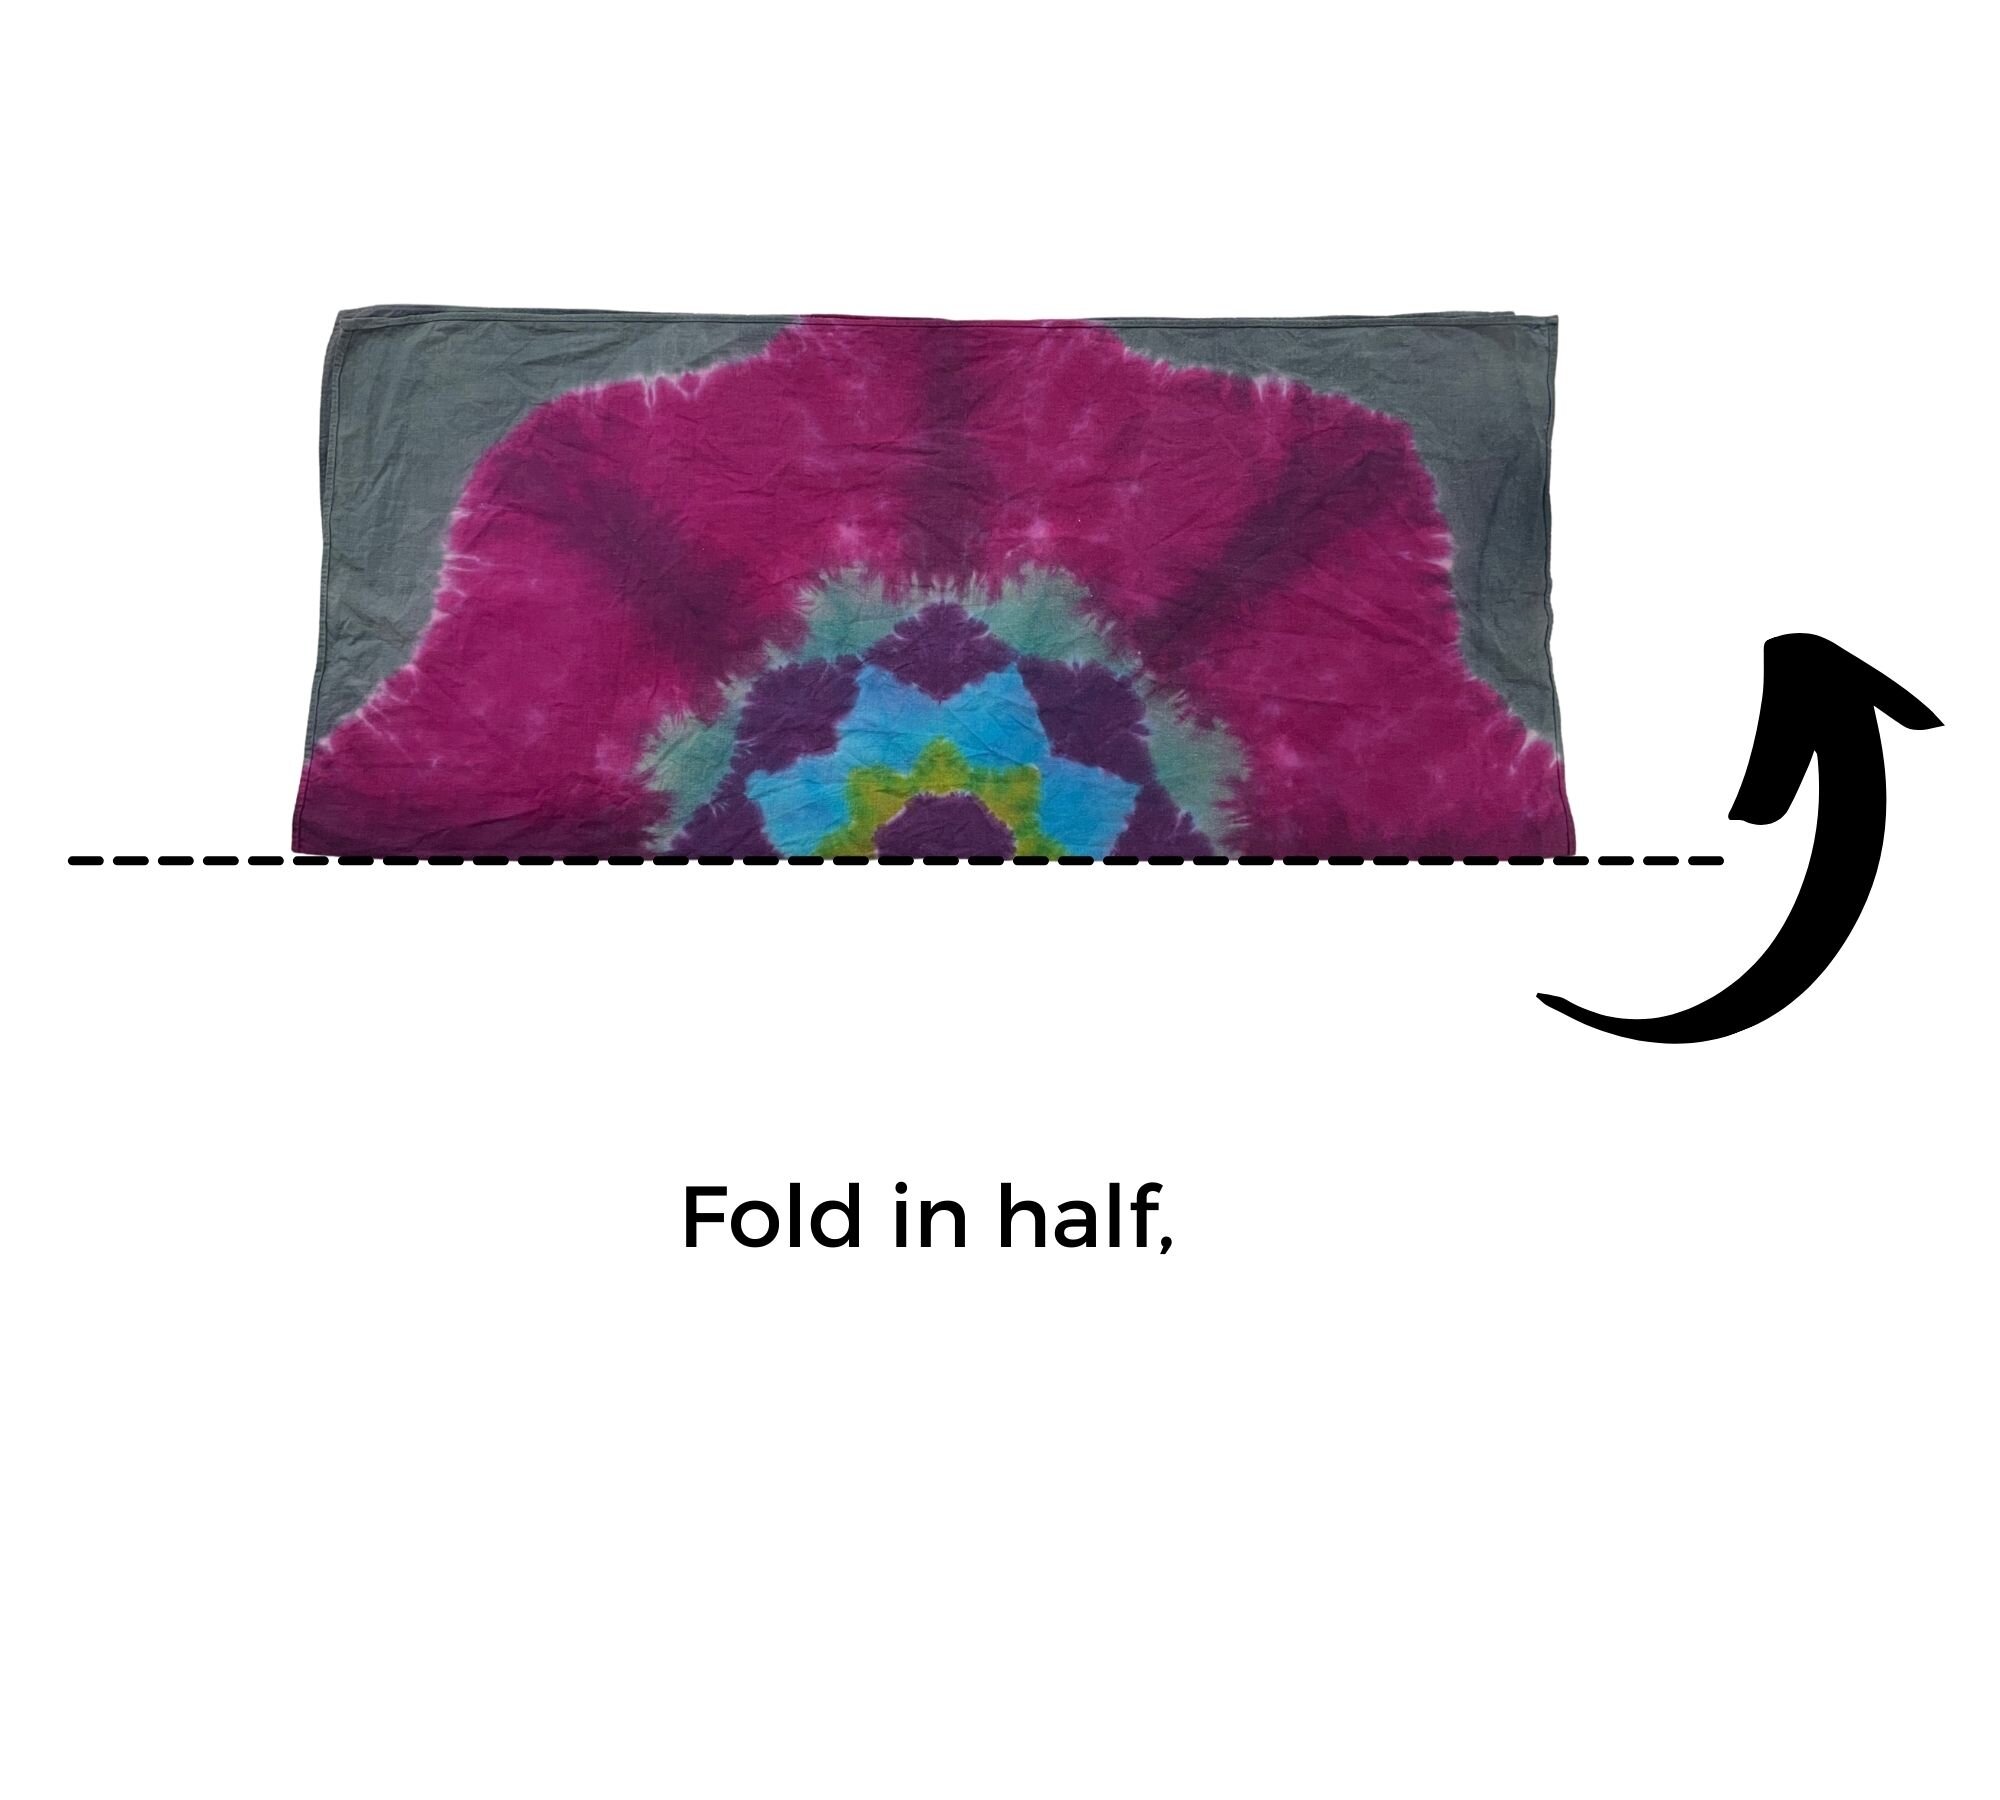
All mandalas start by quartering your fabric. Fold in half, then fold in half again. Easy. Basic. You know how to do this.

See that red dashed line above? It is crucial at this step to identify your “center fold.” Right now, as you fold in half and fold in half again, find the edge of your fabric that only has one folded edge.
You can tell because all the other sides have either 2 or 4 visible layers of cloth right now. The special edge, the one we’ll call the center fold, has only one layer of cloth visible, the single fold.
Don’t overthink this: find the edge that logically can only be the center of the piece, because it doesn’t have multiple layers of fabric visible.
Steps 3-4: Fold the Top & Bottom Corners Towards the Center Fold

Pick up the bottom left corner— top layer only!— and bring it up to align with the center fold line. Just line it right up. You have now folded back the first corner, the top layer of fabric.
After you fold this top layer up and over towards the center fold, you’ll probably experience a moment of hesitation or confusion about what to do with that other side! It’s going to be folded back and under towards the same center fold, mirroring what the top layer did.
Think about folding a paper airplane when you were a kid. Both sides get folded back towards their home base, the center fold.
The top layer gets folded back on its side, and the bottom layer gets folded back on its own side. It looks like this.

Now both layers have been folded towards the center fold, and you’re ready to do exactly that again.
Steps 5-6: Same But Smaller!
Those two moves that you did in steps 3-4, folding the corners back, is now repeated again. Once for the top, once for the bottom. It is crucial that both are folded towards the center fold, and end up at the center fold.
By doing the steps this second time, you’ve now created 8 layers of fabric, and you’re making an 8-pointed mandala.
Think of paper dolls, how they’re folded up like an accordion, snipped, and then opened up to reveal multiple tessellations. You’re setting up your fabric for 8 repeats of the same wedges of color. Those wedges will become the points of your mandala.

Spot Check: Have I Done This Correctly? How To Tell Before You Tie

If you’ve gotten this far, take a sec to check and make sure that your center fold line has all the loose edges of fabric surrounding it, and that the other (non-center-fold side) has two distinct folds on fabric.
You should be able to stick your finger in between the folds, as pictured above. Your center fold will be surrounded with fabric edges, as pictured below, and the other side will have the two clear folds.
If yours looks like this, you’re ready to tie, band, or clamp it up!

How To Ice Dye Mandalas: Tying Technique
A great looking mandala tie-dye relies heavily on how good of a job you do tying it up. Most new dyers want to know how to get folds precise, for really crisp, sharp points and lines.
For that reason, I’m going to talk about tying with sinew. Artificial sinew, faux sinew, or synthetic sinew, is a polyester thick string with very, very high tensile strength, and has no stretch, which is then waxed to be waterproof (and dye-proof!).
All those aspects make it perfect for tie-dye patterns that need to be tied very tightly and not absorb color under the string. Sinew is a great alternative to rubber bands for tie-dye.
It is also excellent for use with delicate fabrics which can be damaged by rubber bands. Plus, the sinew won't get old, dry and brittle like rubber bands will over time.
It’s great for Shibori dyeing, and other techniques as well. I definitely recommend it as an essential dye tool.
Another fun option is to use surgical hemostats! Hemostats clamp onto your lines so you don’t have to tie them. I love the sharp, precise corners that they make.
Hemostats can be a little fiddly, between getting them to clamp and stay clamped, not get in the way of your dyeing, be too long or too unwieldy to fit on your dye rack or in your container… but hey, they’re fun to experiment with!

Hemostat-clamped mandala, ice dyed
The bright white points here are where the hemostats clamped tightly onto the fabric. You can tell that the 2nd hemostat from the center point, the one clamped between green and blue, was not very tight at all— no white on those points.
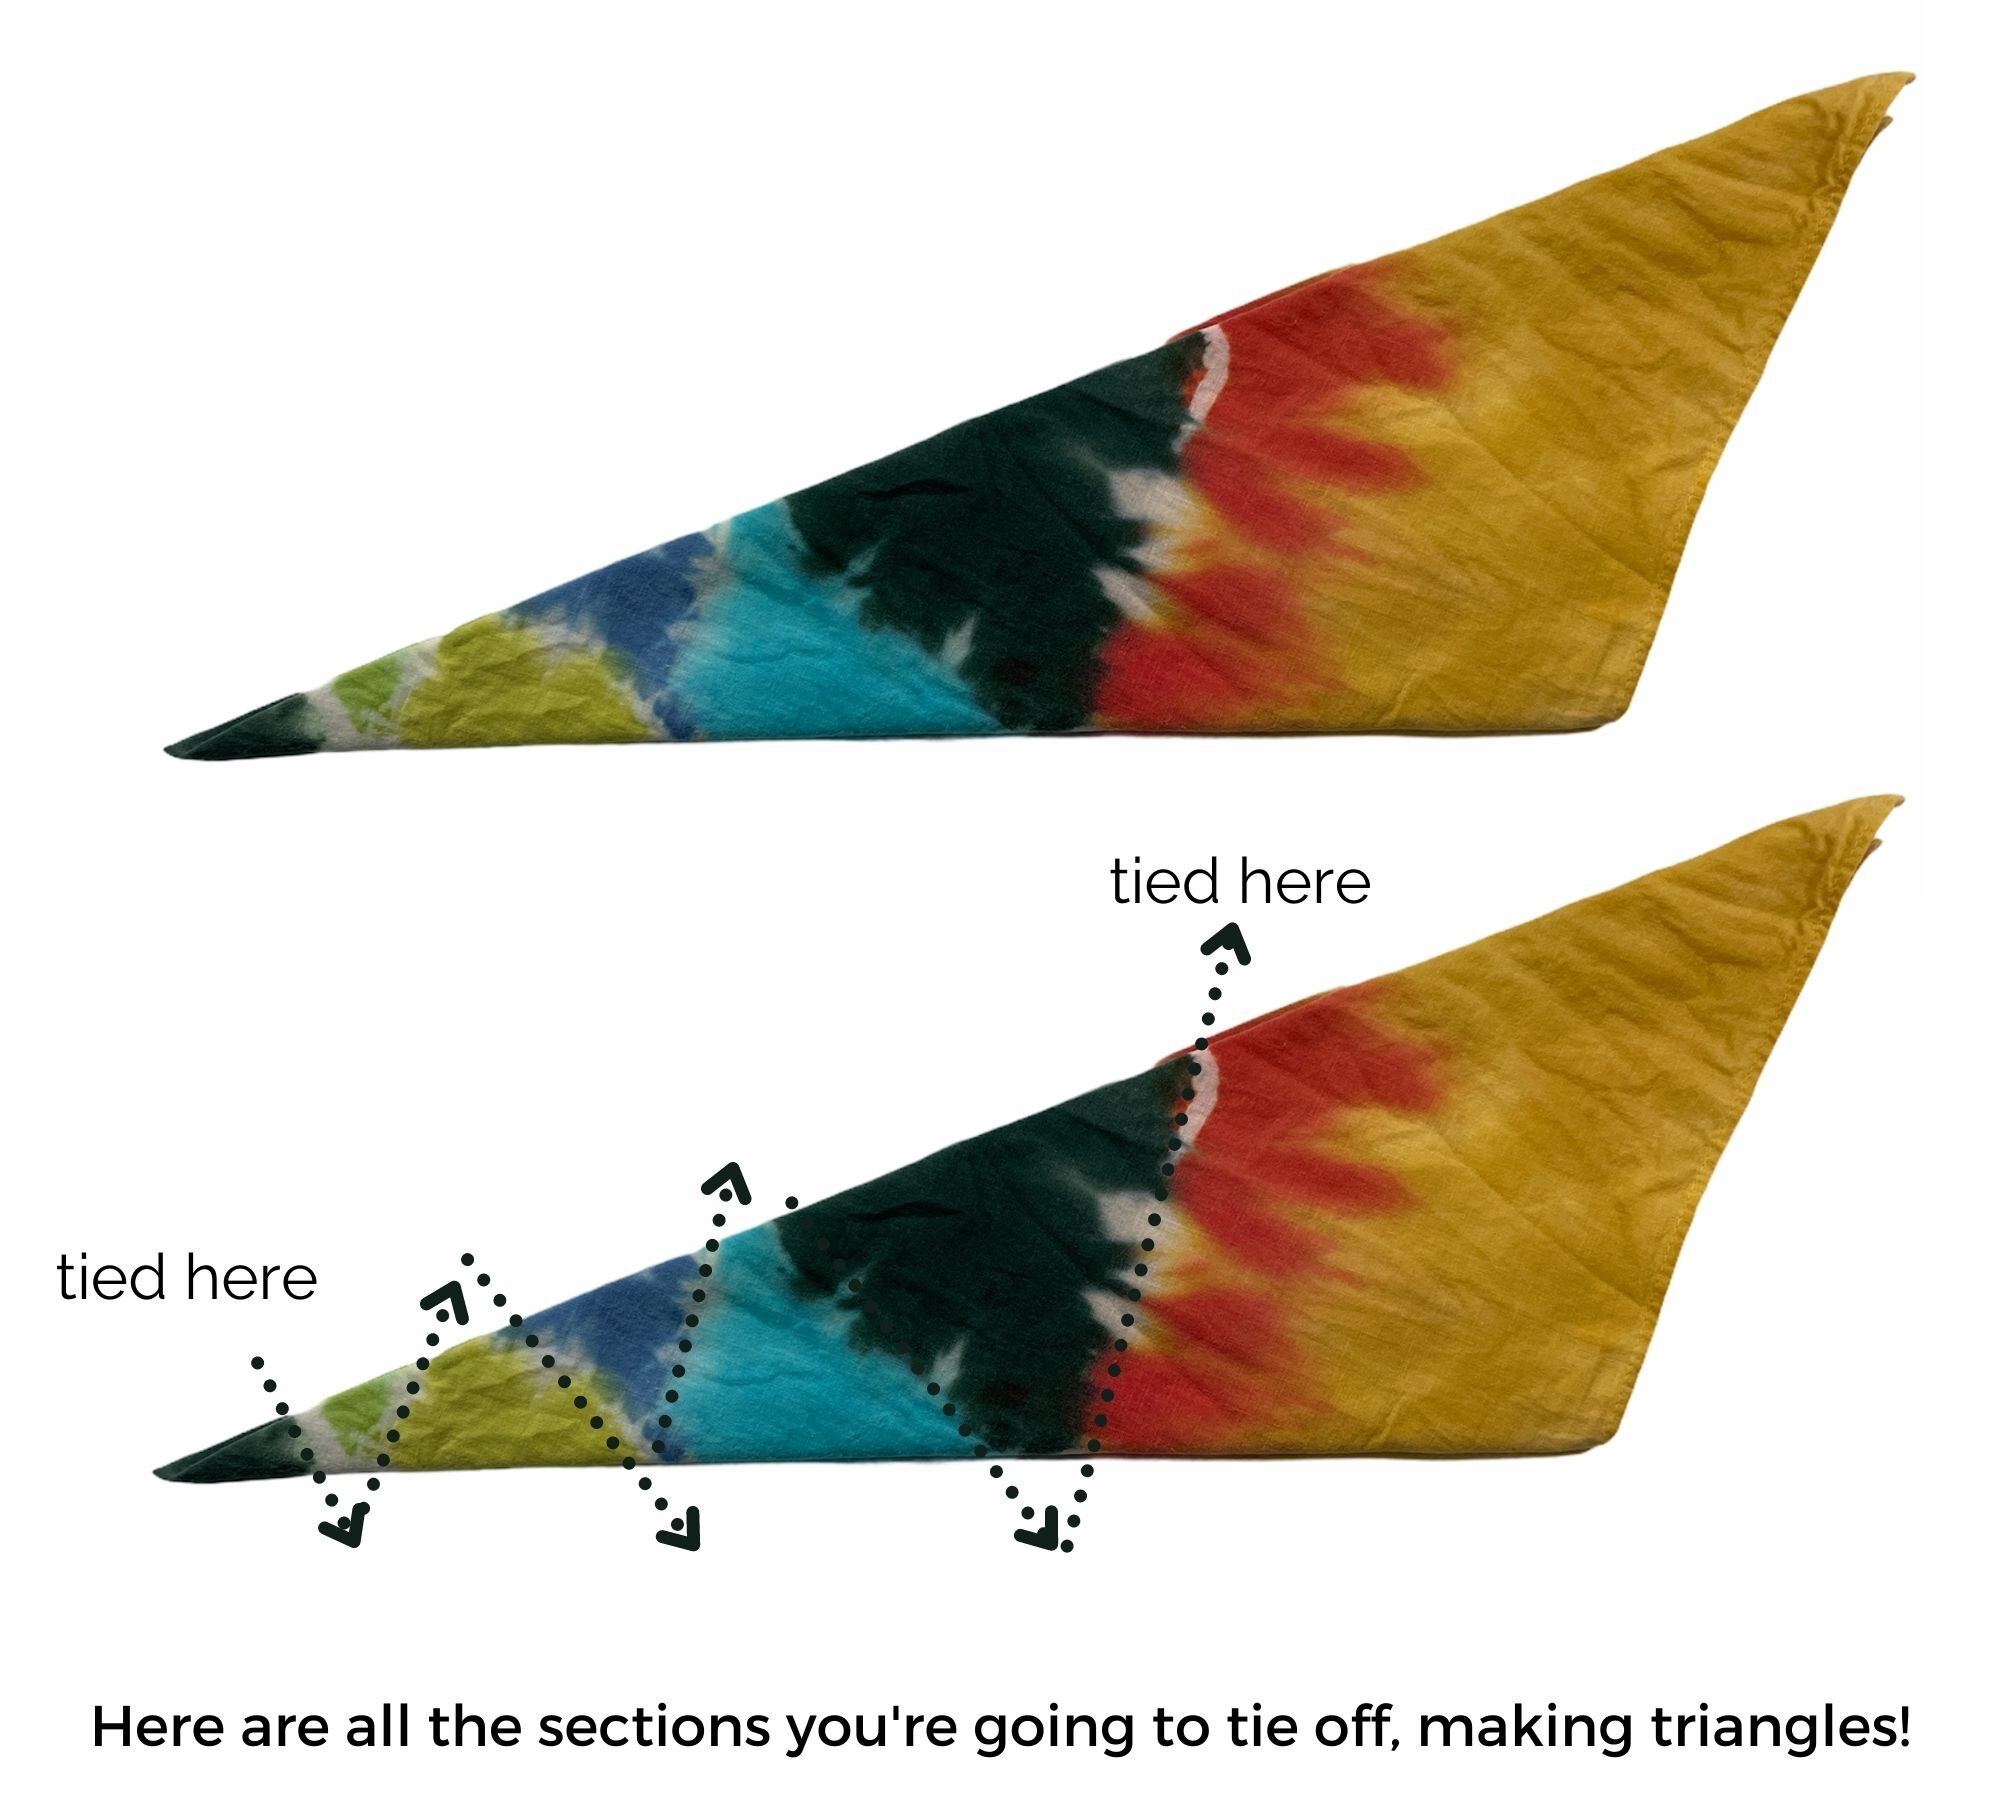
Tip 1: Understanding Your Sections
As you can see from this photo below, you’re going to section off your wedge of folded fabric into triangles, starting from the tip. I like to use washable Magic Markers to make my lines before I try to start tying them!
If you want your mandala to appear as if it’s on a “background,” leave some room at the outer edge (in golden yellow below), after tying off your last triangle. Create as many triangle sections as you want, but don’t make it too hard on yourself.
Four to six sections is plenty to experiment with until you’re cranking out really great lines. This example has six sections, which you can count by the dotted arrows. I just added red on top of the gold next to the final tie for visual interest.

Tip 2: Tying At an Angle
Oh, sinew! You’re so great for this task. Starting with a slipknot, make a loop around your first slanted line. You can start from the longest, thickest (outside) line or from your tiniest, thinnest (innermost) line, down at the tip.
Try it both ways, on two different mandalas, and see which direction you like tying in better. Place your slipknot over the first line that you want to tie and tighten the slipknot.
Now wrap the sinew around that same loop, holding the sinew at the same angle that the line was drawn. You want your sinew to exactly match the slant of the line that you drew!
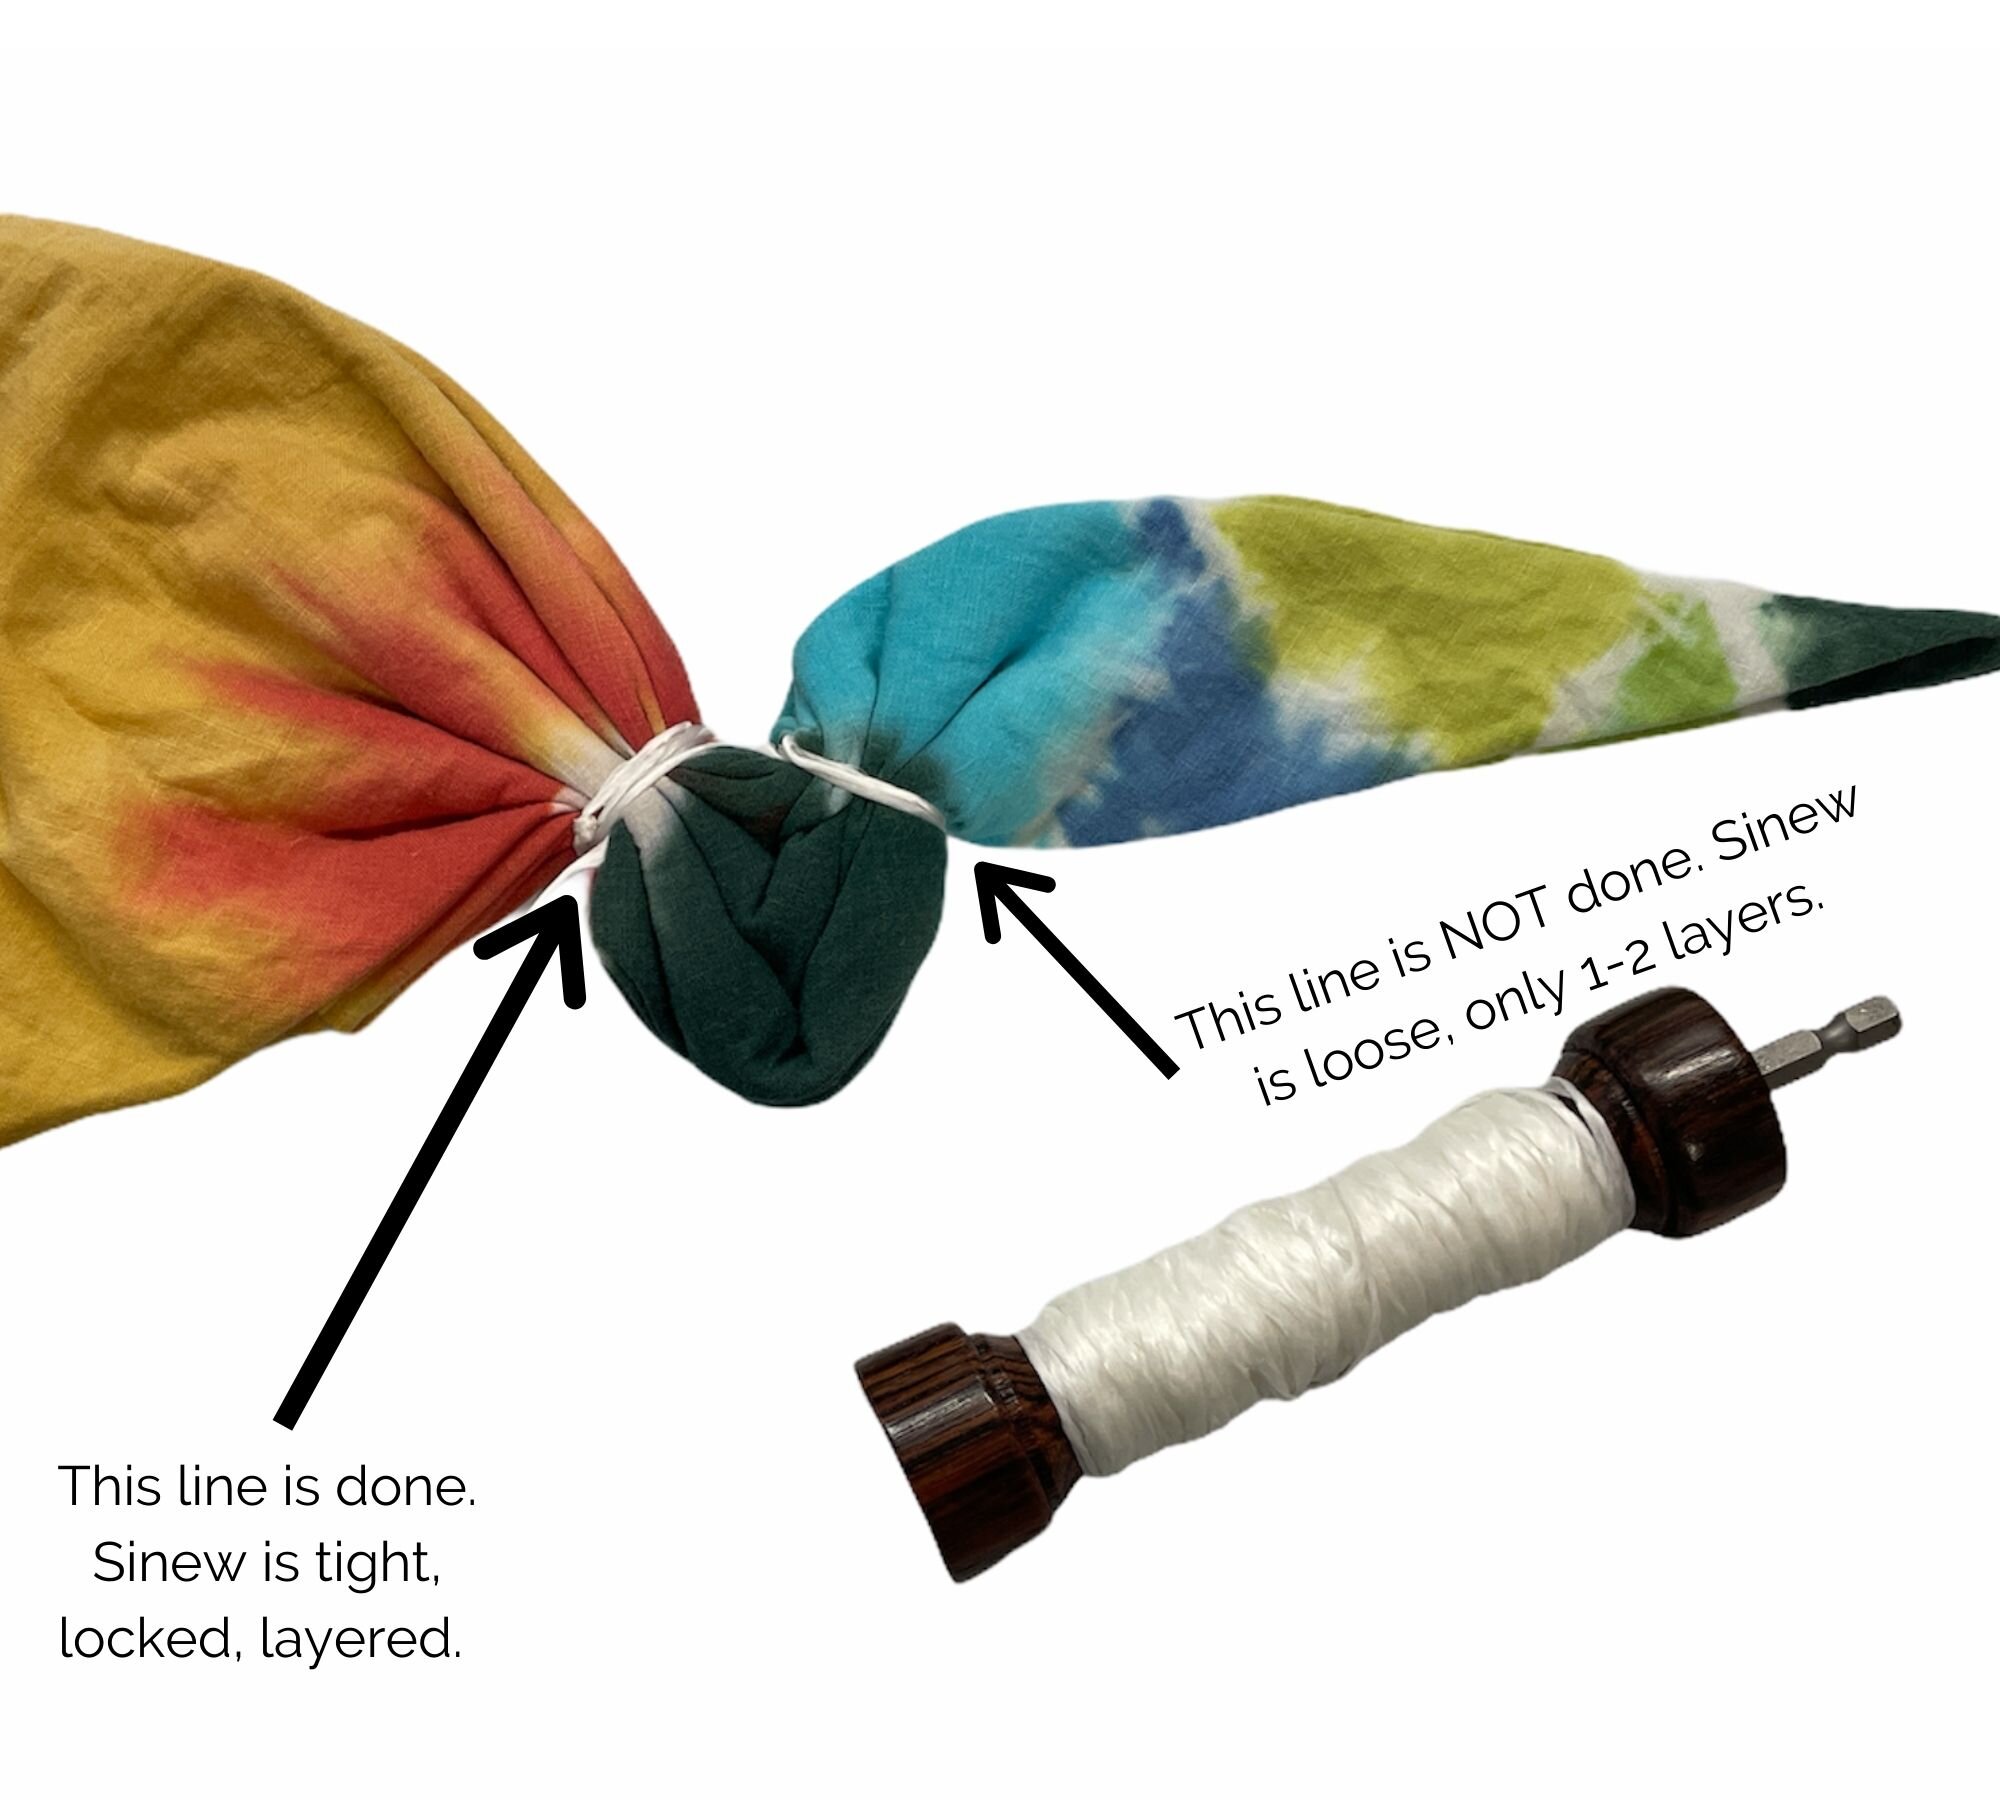
Pull tightly, wrap the sinew around the same place again, and pull tightly again. I do this several times, making a couple passes, each one tighter than the next. You’ll feel the sinew sort of “lock” in place and become immovable if you’re pulling tightly enough.
Tip 3: Pulling Very Tightly
Notice that I have a fancy wooden gripper that I’ve wrapped my sinew around. I bought mine from Michael Higgs, and they’re hand-turned on his lathe.
They’re fabulous. You can order one through his email lightncreation@gmail.com. Note the drill bit for easy loading!
No fancy handle? You can wrap your sinew around the handle of a stout wooden spoon or short piece of small diameter PVC pipe. Just anything strong that you can use to help your hand pull tightly on the sinew.
Once your first line is tied up nice and tight, it is done and you can move on to the neighboring line, which will be at the opposite angled slant. A forward slash, then a back slash, and repeat.
Use patience and precision to tighten the sinew directly on the slanted line. Here’s a time-warp photo showing the exact same mandala (photographed in different lighting on different days) shown superimposed onto itself to make clear how the triangle sections create the “petals” of the mandala.

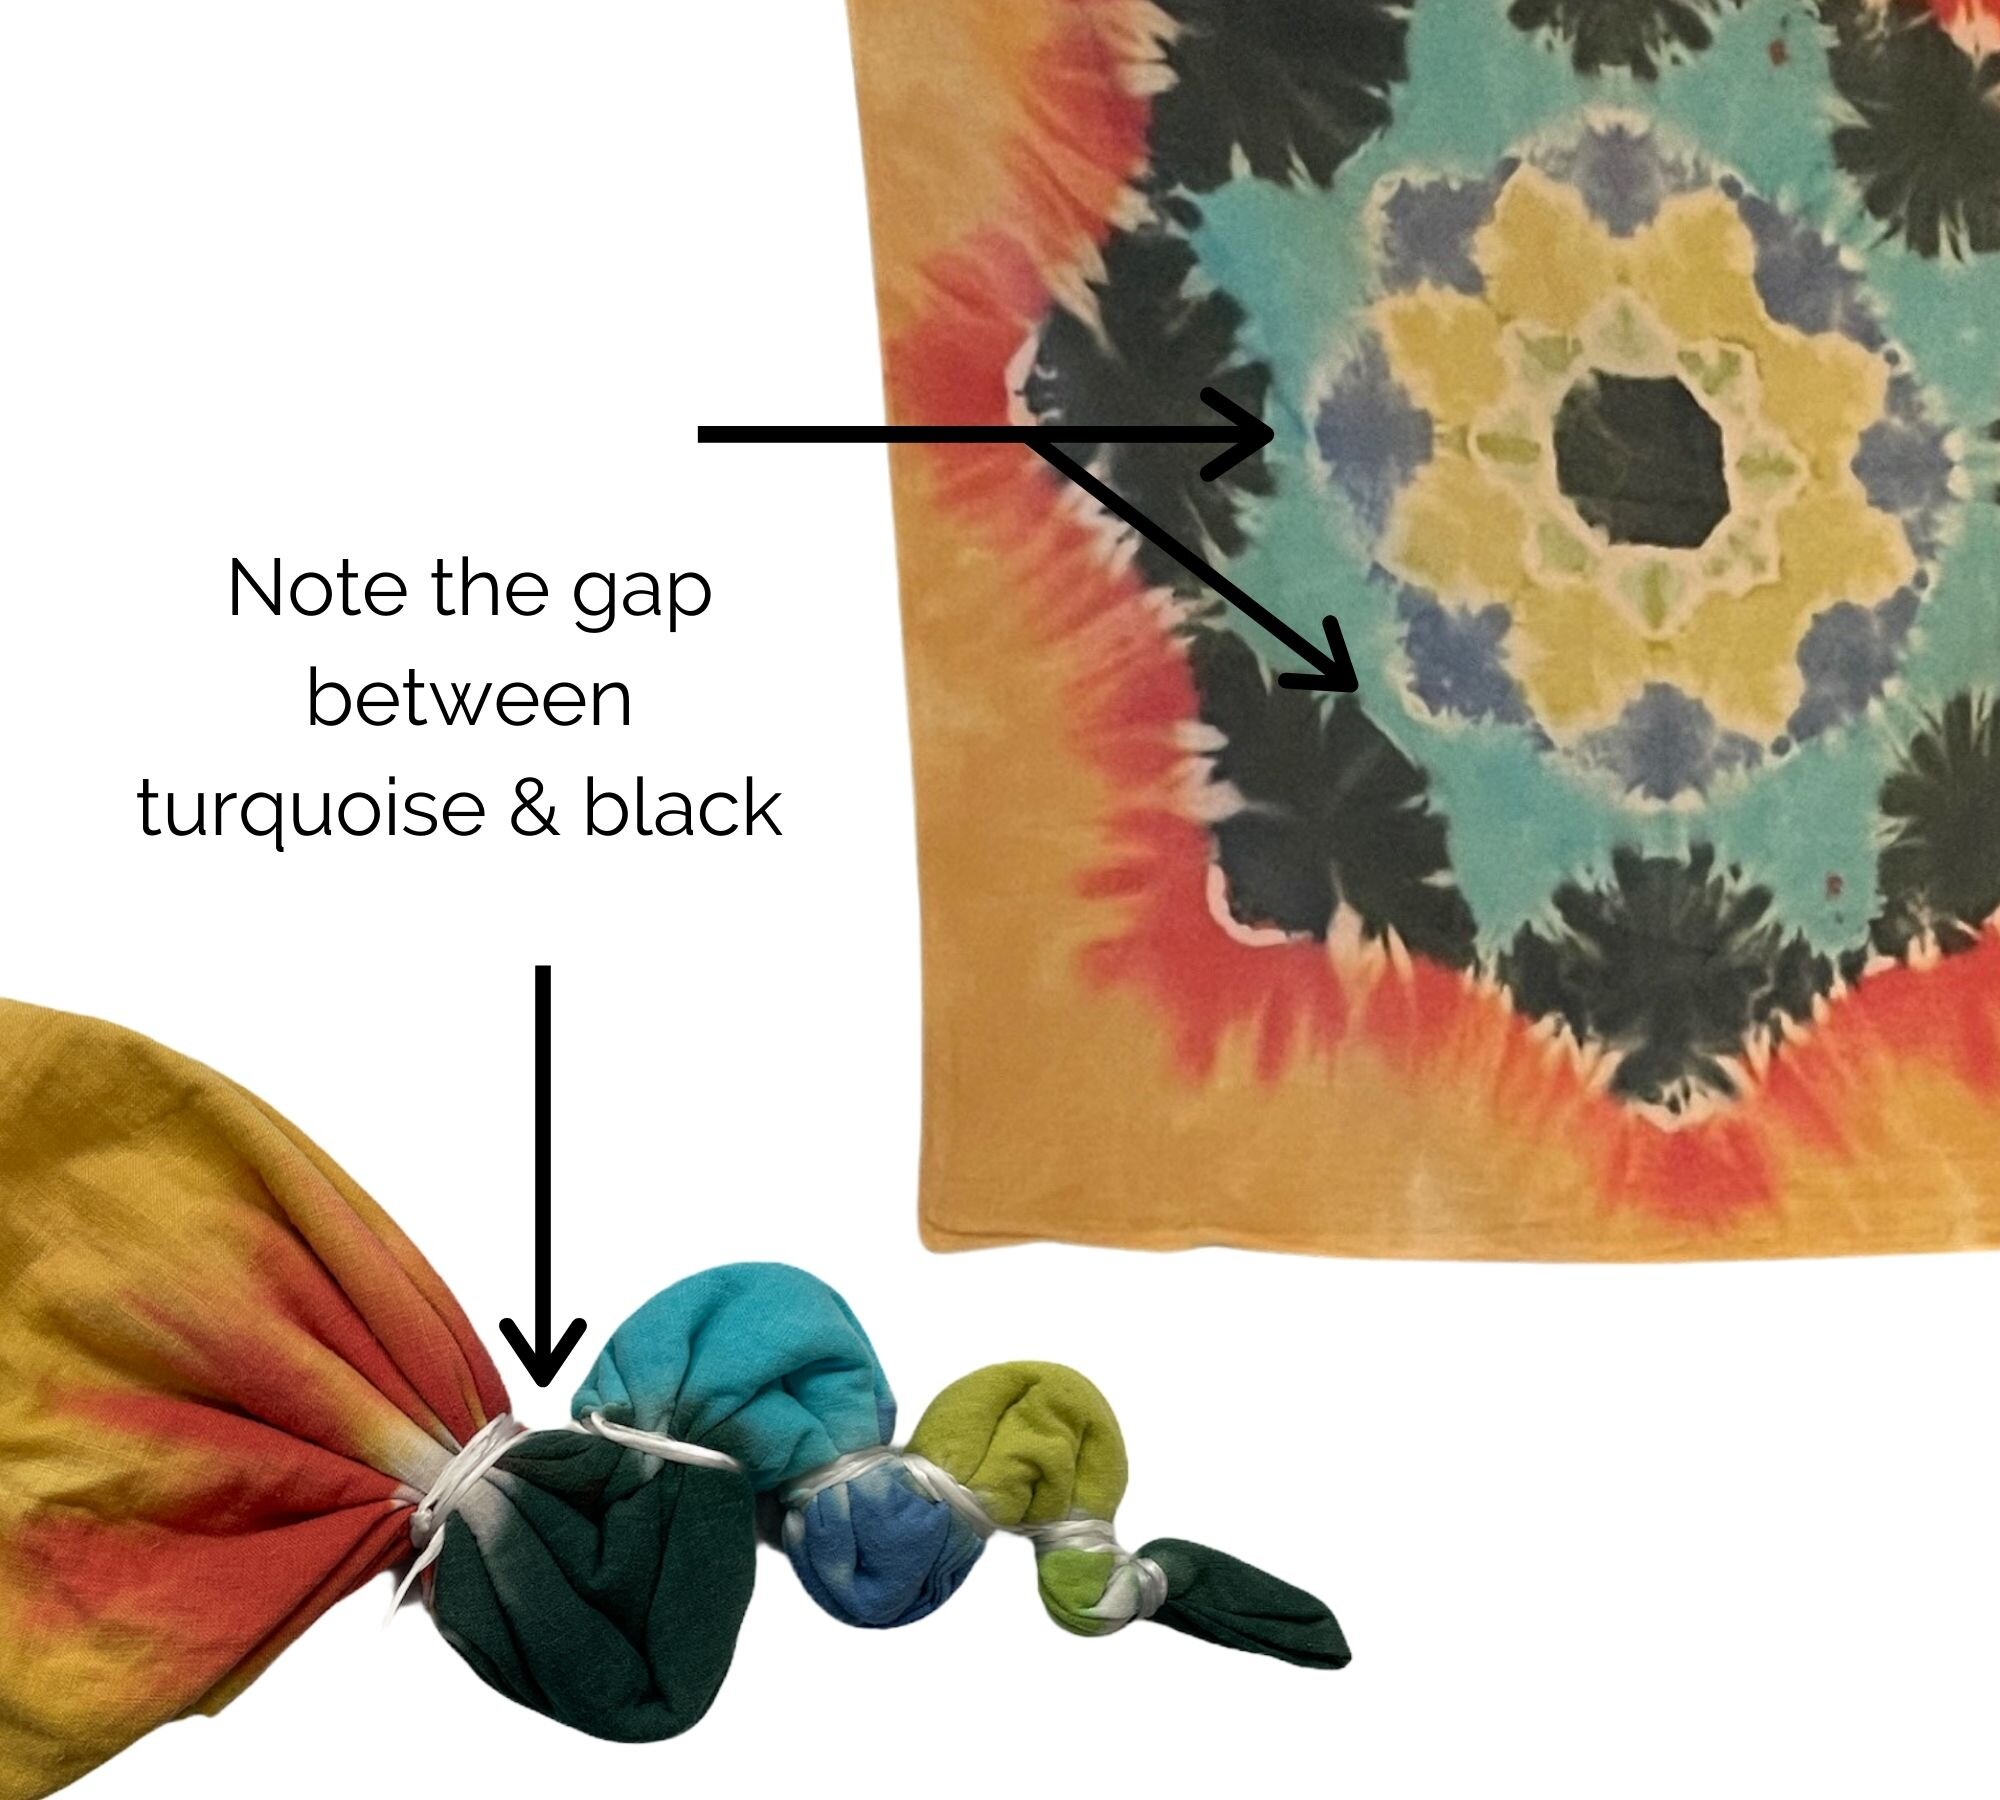
Tip 4: Tie Your Lines So They Touch.
Want to get super fiddly with the details? Want extra good-looking results?
Pay attention to how much space is between your tied sinew lines. Note the gap between my ties, below. That shows up on the final work!
Your forward slash and back slash lines should touch (or get as close as possible— it’s tricky).
How To Ice Dye Mandalas: Dyeing Technique
Now that you have your mandala folded, sectioned, and tied off, you’re ready for color! The very tip will be the center of the mandala, and each triangle will be the next series of “petals” (or stars, or layers, whatever you think of when you look at them). You have some options:
Ice Dyed Mandala— if you are unfamiliar with ice dyeing or need some pro tips, I’ve written a blog post all about ice dyeing (with a handy comparison with liquid dyeing, just because). Or check out my comprehensive online Ice Dye Course. It’s everything I could possibly teach you, all in one place, forever!
Liquid Dyed Mandala— bottle dyeing can be quick and easy if you know how to mix your dyes with water and you have some squeeze bottles (or some other form of liquid applicator) hanging around. Read my blog post on mixing tie dye powder to create liquid dye, or go cruise around my Tie-Dye Basics online course.
Dip Dyed Mandala— For more of a traditional Shibori dyed look, once your sinew is tight, you can submerge your mandala in a small bucket or vat of prepared liquid dye. This Shibori Dyeing 101 course will help guide your way!
The “Background” of the Mandala
Note that your last line that you tied marks the outer edge of your final petals. The fabric beyond that mark is your background, or the color(s) surrounding the mandala itself.
You can dye that space simply or complex, depending on your whims, skill-level, and time. All the examples below were ones I did with no color outside of the petals— no background color at all.
That lets the final petal color bleed and spread out into the background, creating an almost snowflake-like appearance.
More Creative Dyeing Ideas
Go monochromatic and dye each triangle a different shade (or strength) of the same color.
Go with an ombre effect and use two colors, slowly overlapping them and fading from one color at the tip out to the other color at the border, or
Use two colors, alternating back and forth between them (like I did on the bedspread below).
Classic rainbow. Can’t go wrong. Start with red in the center or end with red at the outside.
Liquid dye first, then ice dye over it
Dip (solid) dye first, then ice dye over it
Mandala the front of a shirt and fully process or wash it, THEN mandala the back of the shirt, separately, afterwards. Sneaky!
Reverse (bleach) dye the triangles, then color them, leaving the rest of the shirt solid black
Put mandalas up the side of leggings or skirts. They’re already folded in half, so Step 1 is done for you!

A big project: ice dyeing a mandala on the top (only!) layer of a queen size duvet cover! Whew! I used the same two colors alternating on each triangle.
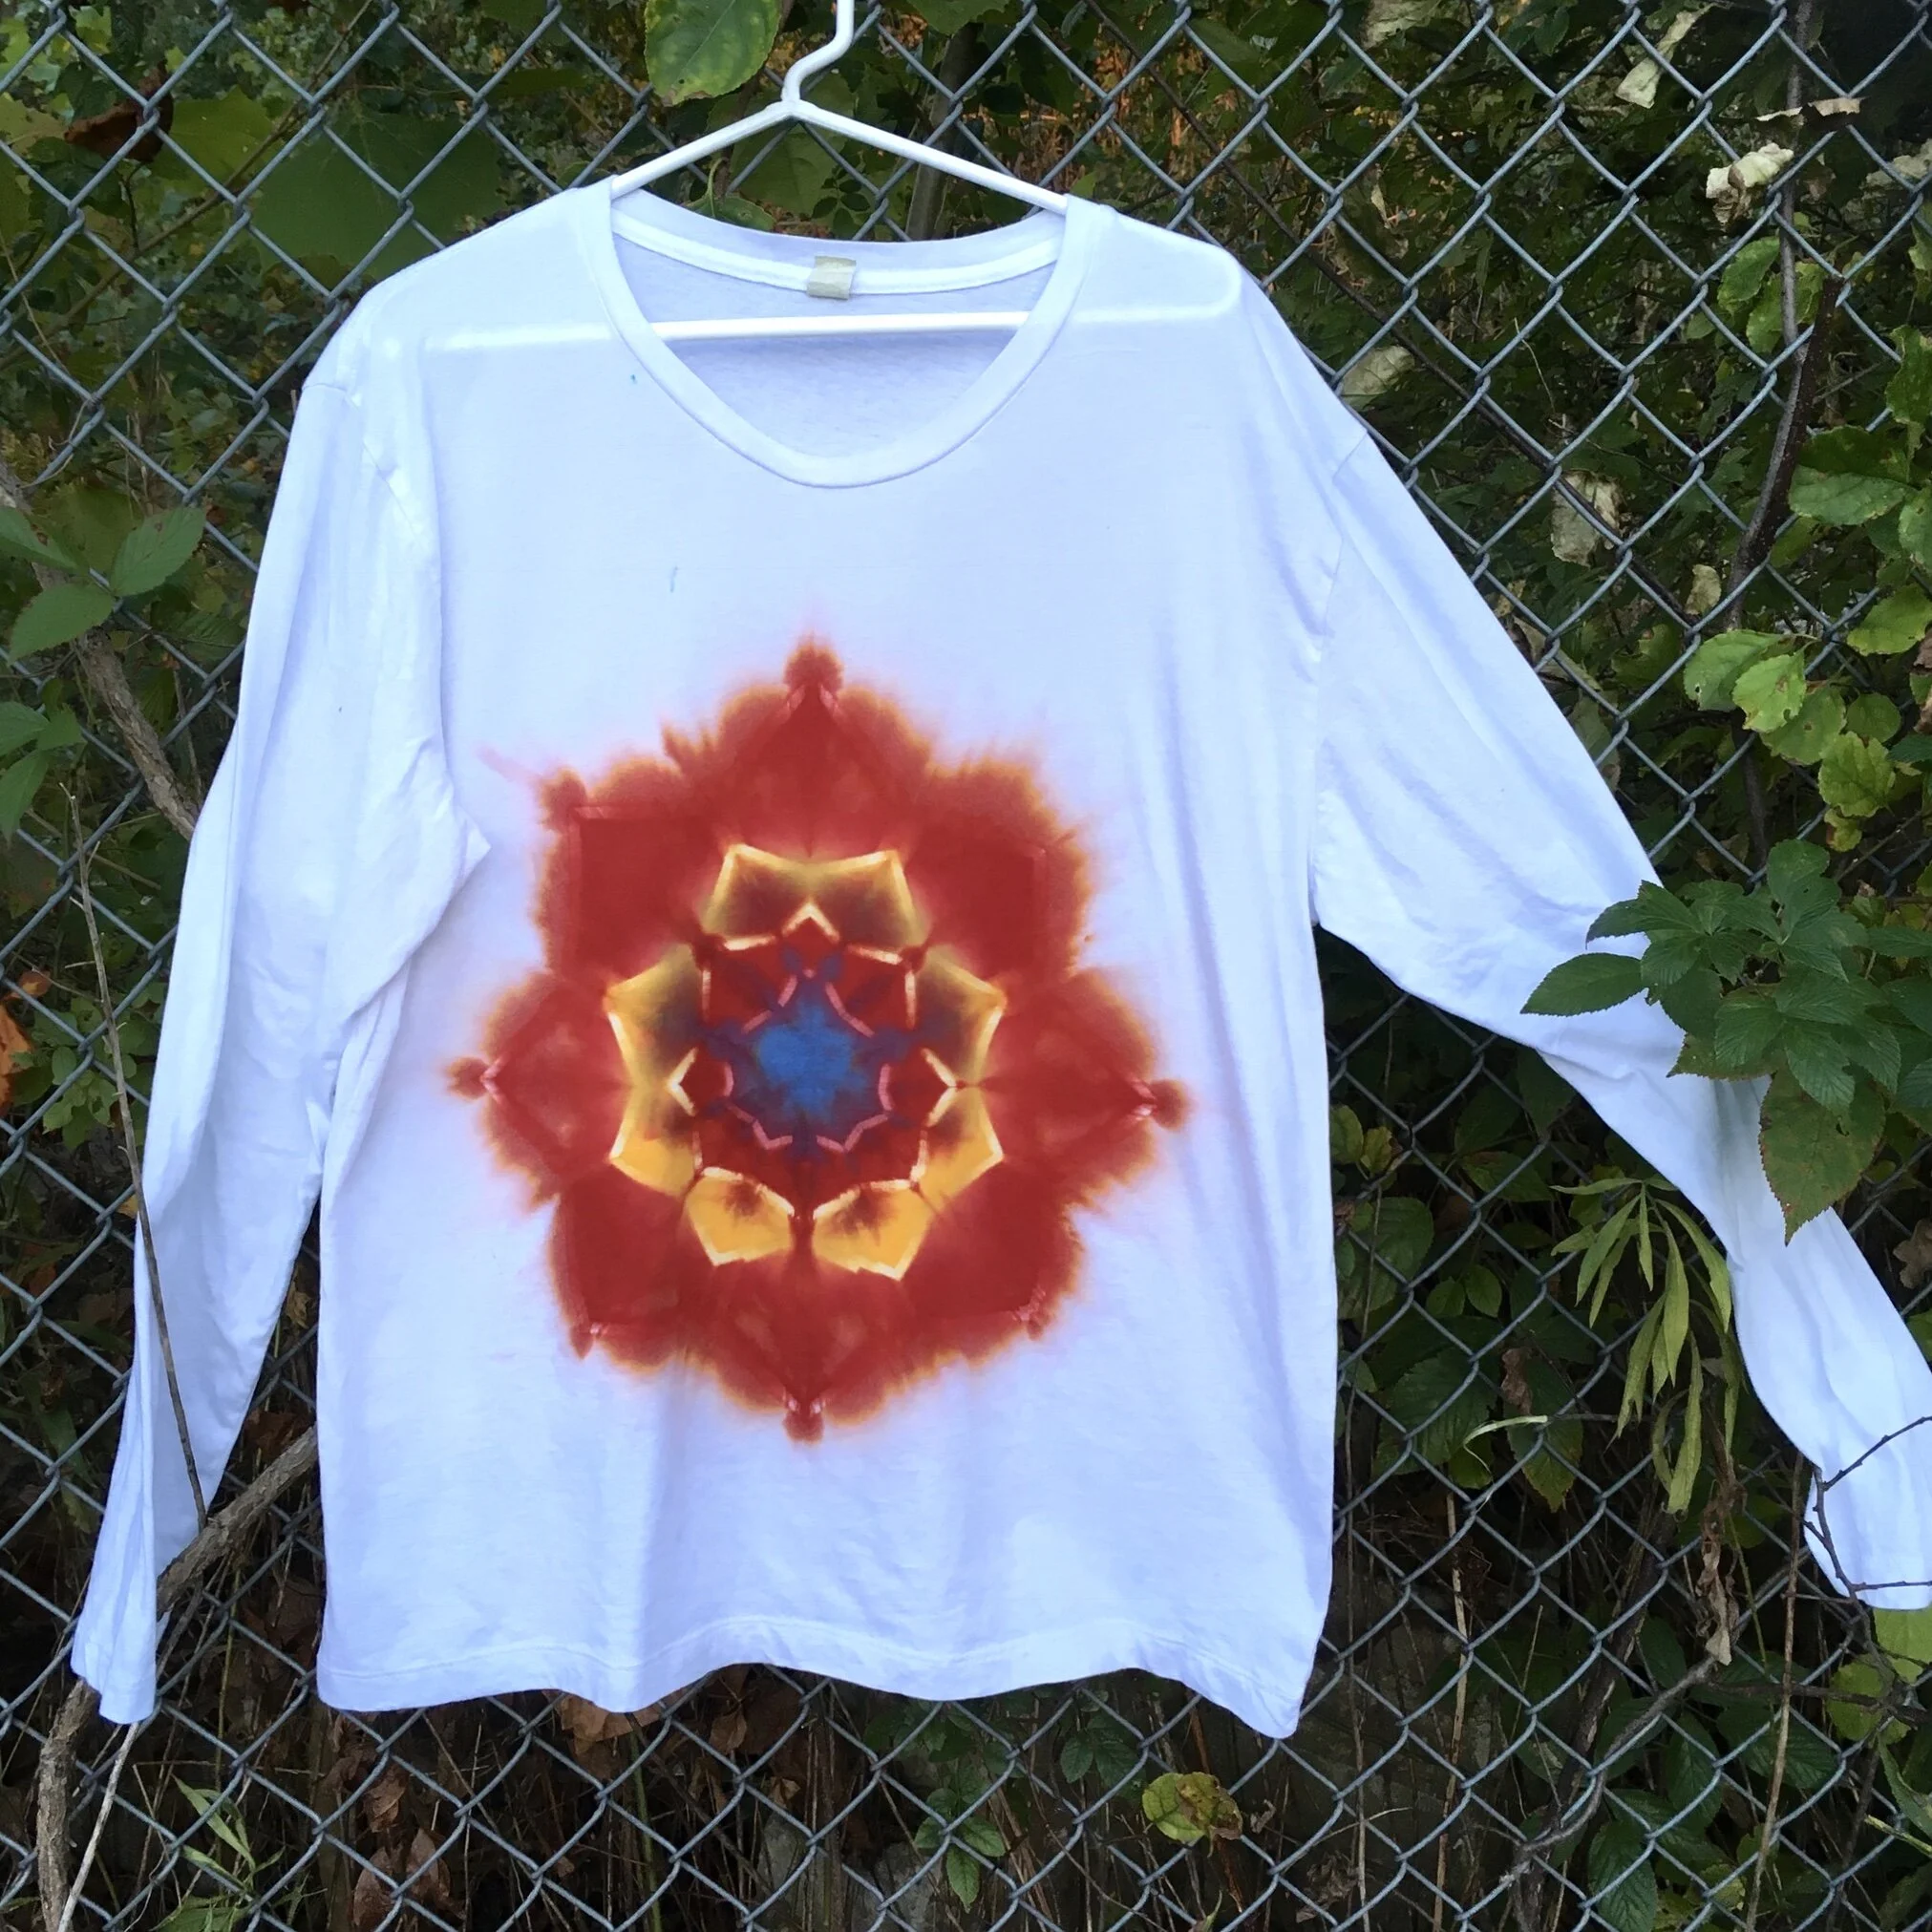
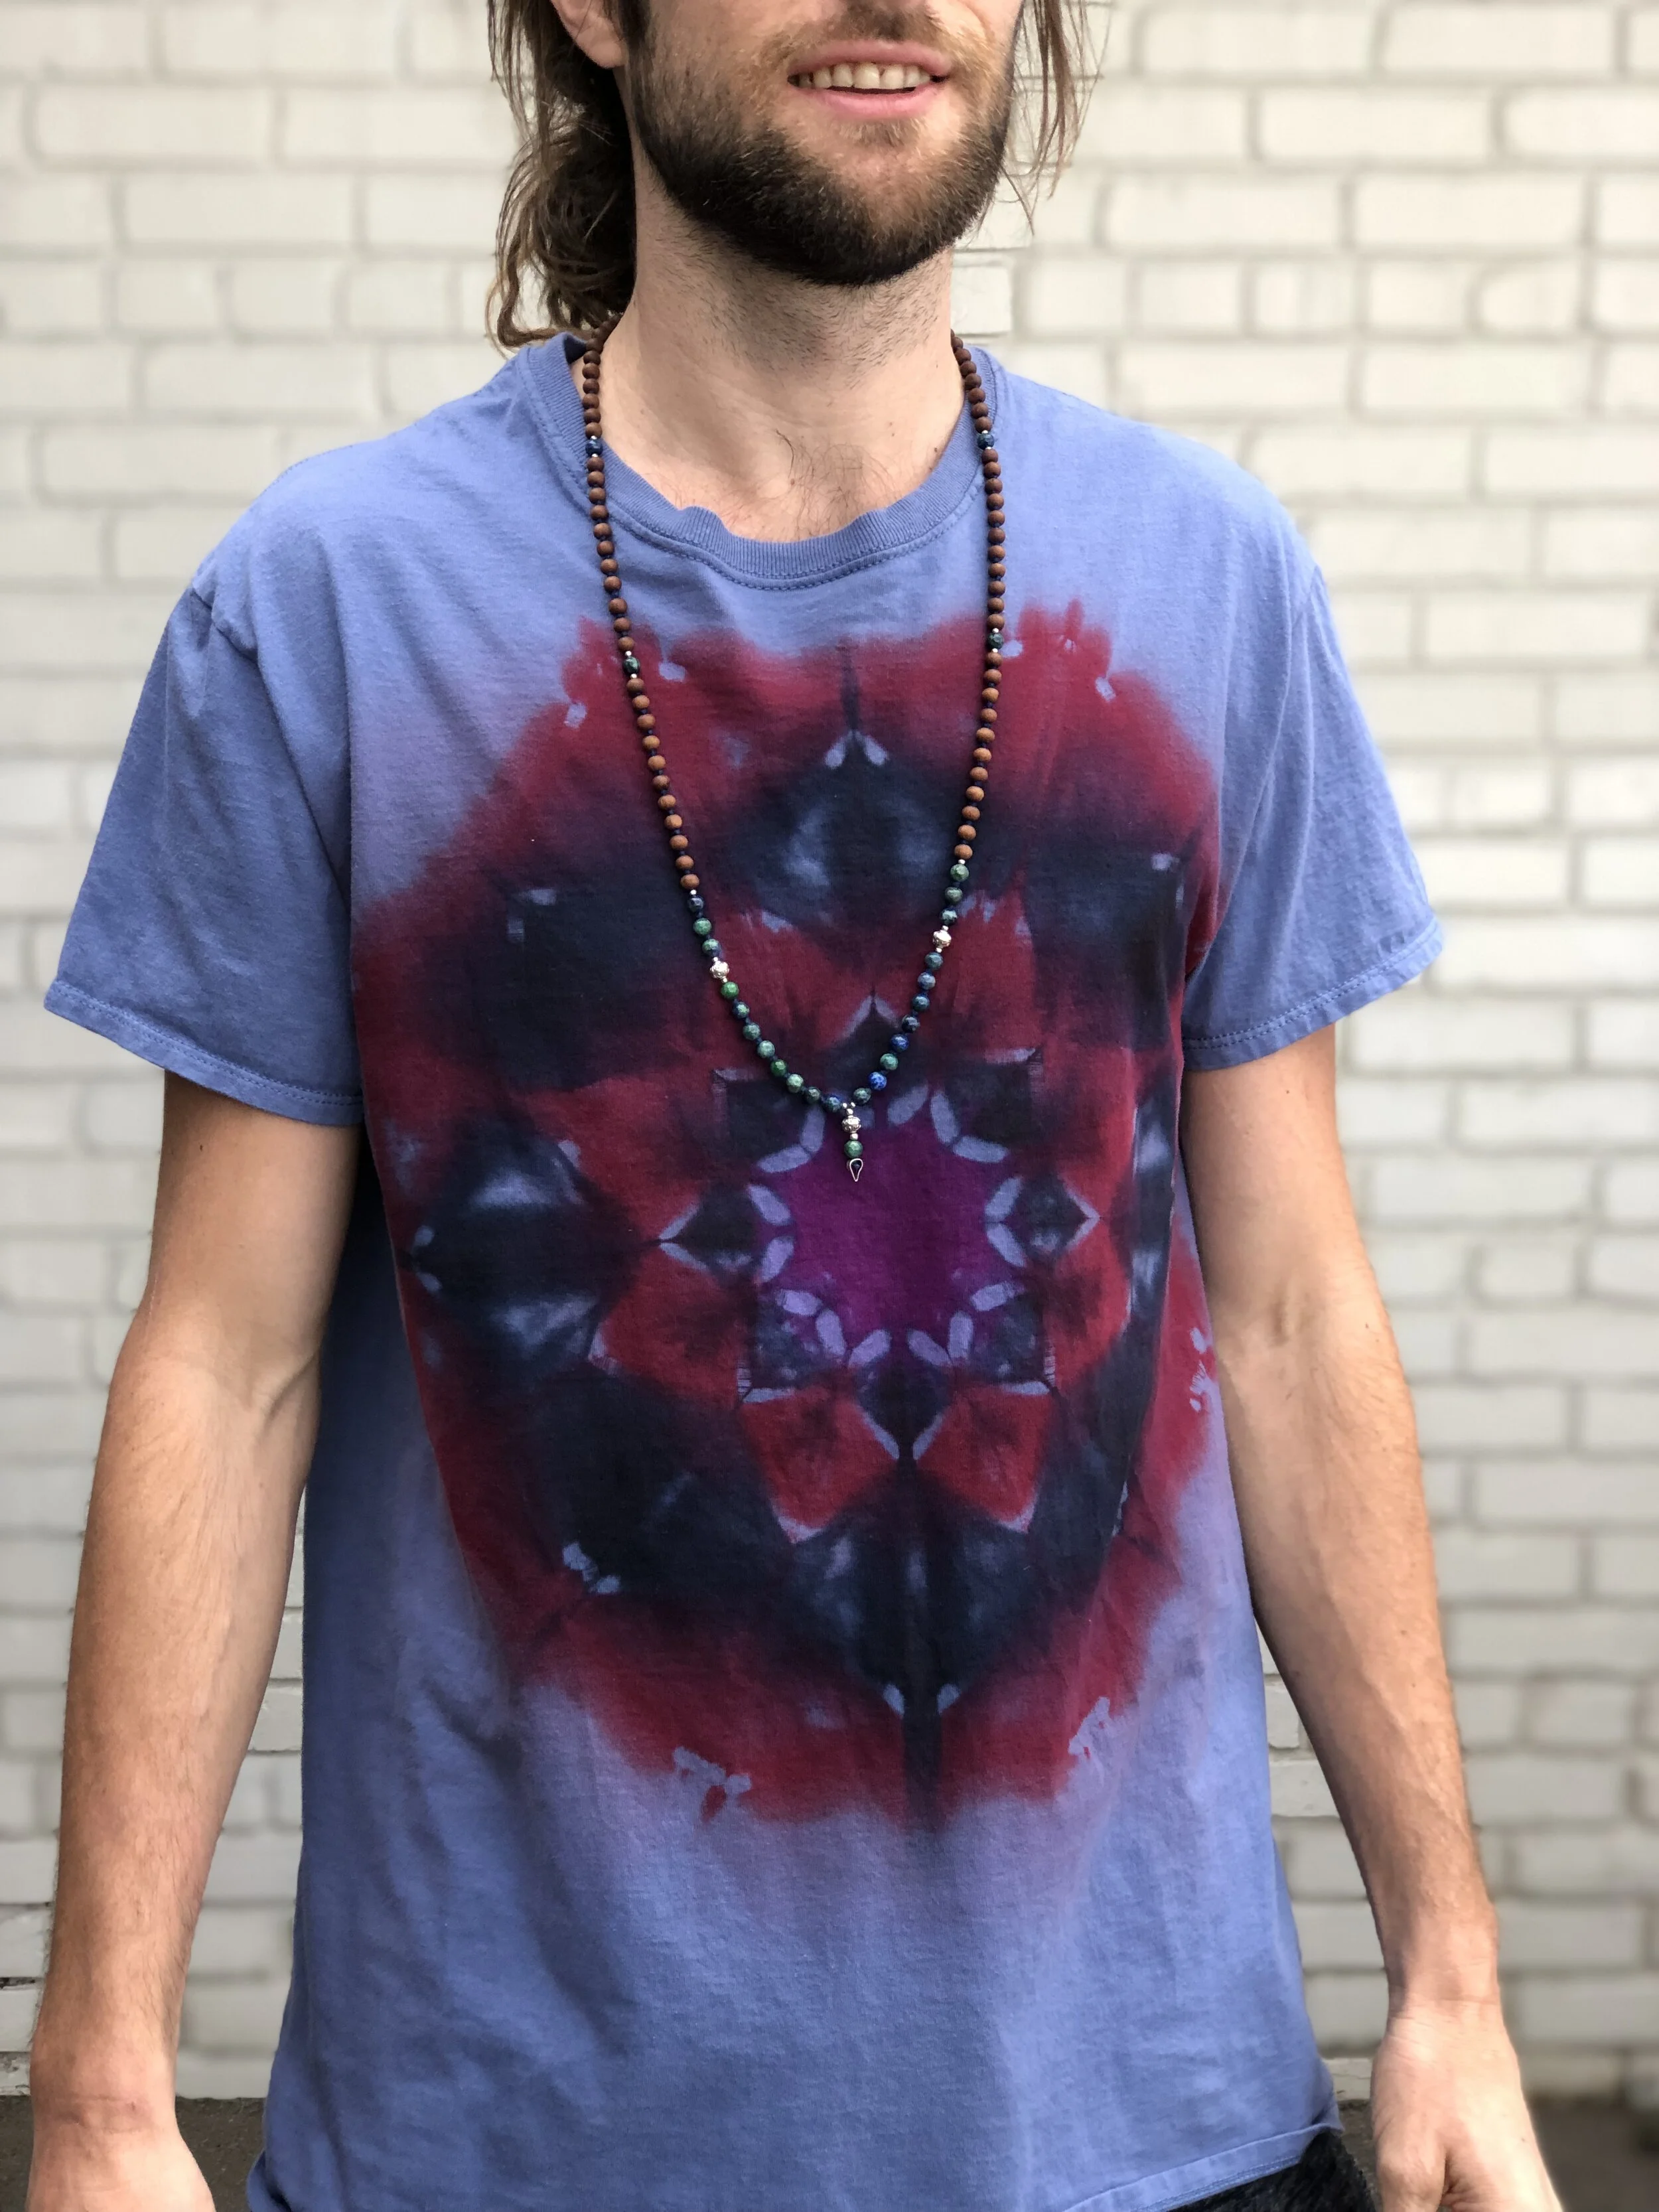
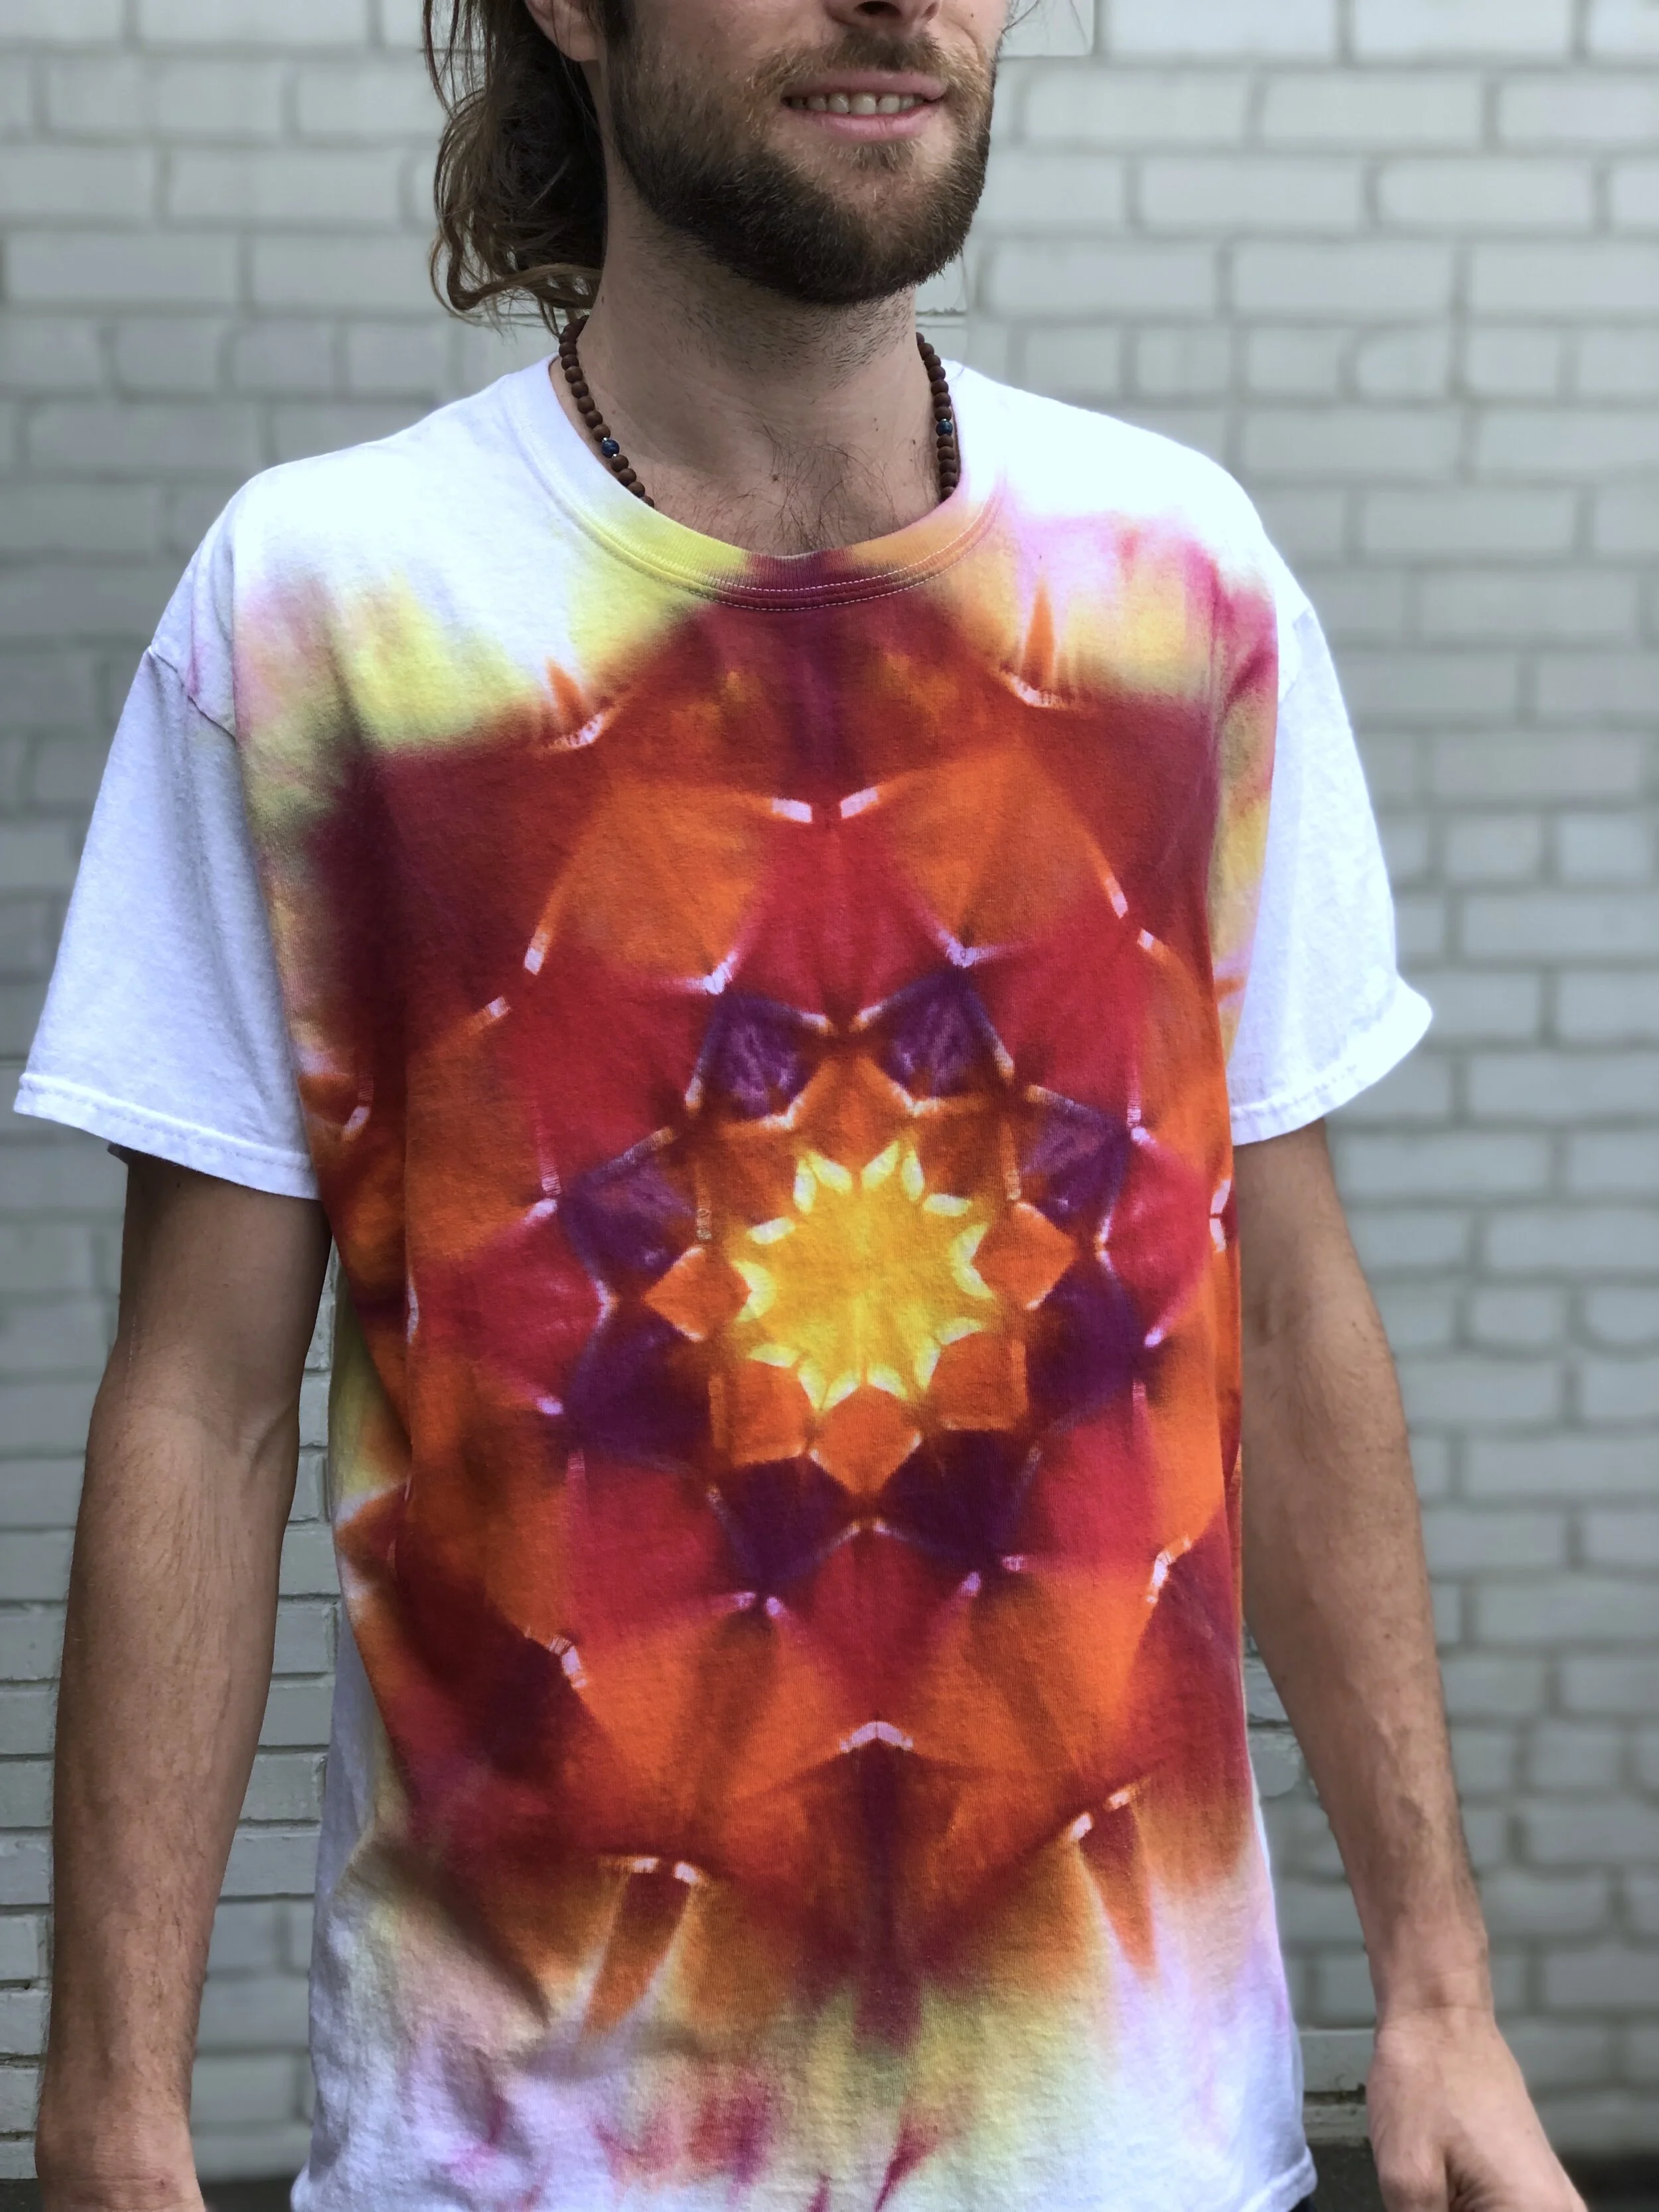
These three shirts were all liquid dyed and clamped with hemostats:
Ice dye mandalas create a very cool and unique design. Why not try it out today?
Even though the folding seems laborious and technical, the more you practice, the easier it’ll get. There really is no way to “mess it up”, although you might just not get the results you’re dreaming of until you’ve really honed the process. Keep practicing, give away lots of scraps and tea towels as practice, and trust that people way less skilled than you have been able to learn this to do— ha! You can achieve excellent mandala tie-dyes if you put in the time and practice practice practice. Even your mess ups will be amazing to someone: find those people, show them your art, and let them boost your ego.
Have a few successful pieces under your belt? Tag me at @waxonstudio on IG/FB and show me what you’ve been working on!